Introduction
In the realm of computer vision, Vision Transformers (ViTs) revolutionized image processing by employing self-attention mechanisms, allowing for a non-sequential analysis of images. ViTs are instrumental in capturing intricate patterns and long-range dependencies, making them invaluable for tasks like image recognition and object detection.
Hugging Face, a hub for cutting-edge machine learning models, offers Vision Transformer models that can be easily downloaded and implemented. However, while Hugging Face documentation provides insight into obtaining image representations using Vision Transformers, it lacks detailed instructions on fine-tuning these models for specific tasks. This gap in information poses a challenge for practitioners eager to utilize ViTs for image classification.
In this article, we bridge this knowledge gap. I will guide you step-by-step through the process of fine-tuning a Vision Transformer model from Hugging Face for image classification in PyTorch. By the end of this guide, you will have a comprehensive understanding of how to harness the full potential of Vision Transformers in your PyTorch-based image classification projects.
Note: All the scripts in this article are executed in a Google Colab notebook.
Installing and Importing Required Libraries
You will need to install the Hugging Face Transformers library to run scripts in this article.
! pip install accelerate -U
! pip install datasets transformers[sentencepiece]
The following script imports the Python libraries and modules required to execute Python codes in this article.
from transformers import ViTModel, ViTFeatureExtractor, ViTModel, AdamW
import torch
import torch.nn as nn
from torch.utils.data import Dataset, DataLoader
from datasets import load_dataset
import pandas as pd
import os
from PIL import Image
import random
import numpy as np
from sklearn.model_selection import train_test_split
from sklearn.metrics import f1_score, classification_report, accuracy_score
from matplotlib import pyplot as plt
Importing the datasets
This article guides you through the process of creating a binary classification model. Using facial images as inputs, the model accurately predicts a person's gender. You can download the dataset from Kaggle.
The data directory looks like this:

We will create a Pandas Dataframe that contains three columns:
- file_path: contains the file paths of all images with the
.jpgextension. - category: specifies the image's folder name, i.e.
Female FacesorMale Faces. - class: equals one if the image is in the
Male Facesfolder and 0 if the image is in theFemale Facesdirector.
This DataFrame helps us quickly retrieve images and corresponding labels for training.
The following script defines the create_image_dataframe() method, which creates the desired Pandas DataFrame.
def create_image_dataframe(data_dir):

    file_paths = []
    categories = []
    classes = []

    for category in os.listdir(data_dir):
        category_path = os.path.join(data_dir, category)
        if os.path.isdir(category_path):
            class_label = 0 if category == r'Female Faces' else 1
            for filename in os.listdir(category_path):
                if filename.endswith('.jpg'):
                    file_paths.append(os.path.join(category_path, filename))
                    categories.append(category)
                    classes.append(class_label)

    data = {
        'file_path': file_paths,
        'category': categories,
        'class': classes
    }

    df = pd.DataFrame(data)
    df = df.sample(frac=1).reset_index(drop=True)
    return df

data_dir = '/content/male-and-female-faces-dataset/Male and Female face dataset'
image_df = create_image_dataframe(data_dir)

print(image_df.shape)
print(image_df.category.value_counts())
image_df.head()
Running the above script returns the following output:
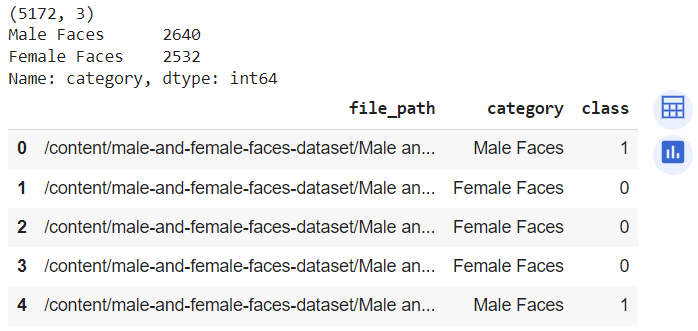
The output shows that the dataset consists of 5172 images, where 2640 images contain male faces, while 2532 images contain female faces. You can also see the resultant Pandas DataFrame.
Creating a PyTorch Dataset For Images
The next step is to create a PyTorch dataset. Though this step is not necessary, it can help you efficiently train your model in batches, which can be crucial, especially if you are training your model on a low-memory system.
Our dataset will consist of image features and corresponding labels. To create image features for Vision Transformer, you can use the ViTFeatureExtractor. This feature extractor takes an image as input and returns pixel values you can pass to Vision Transformer.
The following script imports the feature extractor. Here, the model_checkpoint variable stores the checkpoint for an already trained Vision Transformer. You will use the same checkpoint for creating the model.
Furthermore, the code is configured to utilize the GPU if CUDA is available; otherwise, it defaults to running on the CPU.
model_checkpoint = "google/vit-base-patch16-224-in21k"
image_processor = ViTFeatureExtractor.from_pretrained(model_checkpoint)
device = torch.device('cuda' if torch.cuda.is_available() else 'cpu')
Next, we define a method that converts our Pandas DataFrame to a PyTorch dataset.
class ImageClassificationDataset(Dataset):
    def __init__(self, data_df, image_processor):
        self.data_df = data_df
        self.image_processor = image_processor
        #self.max_length = 256 # set a fixed maximum length

    def __len__(self):
        return len(self.data_df)

    def __getitem__(self, index):

        image_path = self.data_df.iloc[index]['file_path']
        image_val = Image.open(image_path)

        if image_val.mode != 'RGB':
          image_val = image_val.convert('RGB')

        image_encodings = image_processor(image_val, return_tensors="pt")

        labels = self.data_df.iloc[index][['class']].values.astype(np.float32)

        return image_encodings, labels
We will split our data set into train (70%), validation (30%), and test(30%) sets:
train_df, temp_df = train_test_split(image_df, test_size=0.3, random_state=42)

val_df, test_df = train_test_split(temp_df, test_size=0.5, random_state=42)
Finally, we can convert our train_df, test_df, and val_df DataFrames to PyTorch datasets using the following script. To iterate through the datasets in batches, we also create corresponding DataLoader objects with a batch size of 32.
train_dataset = ImageClassificationDataset(train_df, ViTFeatureExtractor)
test_dataset = ImageClassificationDataset(test_df, ViTFeatureExtractor)
val_dataset = ImageClassificationDataset(val_df, ViTFeatureExtractor)

batch_size = 32

train_loader = DataLoader(train_dataset, batch_size=batch_size, shuffle=True)
val_loader = DataLoader(val_dataset, batch_size=batch_size, shuffle=False)
test_loader = DataLoader(test_dataset, batch_size=batch_size, shuffle=False)
Creating a PyTorch Model for Fine-tuning
We are now ready to fine-tune the Vision Transformer model on our dataset. To do so, we will create a model class that accepts the Vision Transformer encoder as a parameter and pass the encoder's output through 5 dense layers. The last dense layer consists of 1 label since we plan to predict a binary value i.e. 0 or 1. The sigmoid function in the final dense layer will return a value between 0 and 1.
class ImageClassifier(nn.Module):
    def __init__(self, num_labels, encoder):
        super(ImageClassifier, self).__init__()
        self.encoder = encoder
        self.classifier = nn.Sequential(
            nn.Linear(self.encoder.config.hidden_size, 500),
            nn.ReLU(),
            nn.Linear(500, 300),
            nn.ReLU(),
            nn.Linear(300, 100),
            nn.ReLU(),
            nn.Linear(100, 50),
            nn.ReLU(),
            nn.Linear(50, num_labels),
            nn.Sigmoid()
        )

    def forward(self, input_values):
        outputs = self.encoder(pixel_values = input_values)
        pooled_output = outputs['last_hidden_state'][:, 0, :]
        logits = self.classifier(pooled_output)
        return logits
After that, we will initialize a Vision Transformer encoder and create an object of the ImageClassifier class. We also specify the number of labels (1 in our case), and the loss function and optimizer.
# Set up the model, optimizer, scheduler, and loss function
num_labels = 1
encoder = ViTModel.from_pretrained("google/vit-base-patch16-224-in21k")
model = ImageClassifier(num_labels, encoder).to(device)
optimizer = AdamW(model.parameters(), lr=0.0001, betas=(0.9, 0.999), eps=1e-08)
criterion = nn.BCELoss()
Subsequently, we define the train() method that accepts the model, train and validation data loaders, the optimizer, criterion (loss function), device, and number of epochs as parameters. The train() method trains the model and prints the loss for each batch.
# Define the training function
def train(model, train_loader, val_loader, optimizer,  criterion, device, num_epochs):

    best_accuracy = 0.0

    for epoch in range(num_epochs):

        model.train()

        for i, batch in enumerate(train_loader):

            image_encodings,  labels = batch
            pixel_values = image_encodings.pixel_values
            pixel_values = pixel_values.squeeze()
            pixel_values = pixel_values.to(device)

            labels = labels.to(device)

            optimizer.zero_grad()

            logits = model(pixel_values)

            loss = criterion(logits, labels)
            loss.backward()

            optimizer.step()

            if (i+1) % 8 == 0:
                print(f'Epoch {epoch+1}/{num_epochs}, Batch {i+1}/{len(train_loader)}, Train Loss: {loss.item() :.4f}')
                train_loss = 0.0

        val_loss, val_accuracy, val_f1, _ , _ = evaluate(model, val_loader, device)

        if val_accuracy > best_accuracy:
            best_accuracy = val_accuracy
            torch.save(model.state_dict(), 'best_model.pt')

        print("========================================================================================")
        print(f'Epoch {epoch+1}/{num_epochs}, Val Loss: {val_loss:.4f}, Val Accuracy: {val_accuracy:.4f}, Val F1: {val_f1:.4f}, Best Accuracy: {best_accuracy:.4f}')
        print("========================================================================================")
The train() method also prints the loss, accuracy, and F-1 score on the validation set using the evaluate() method, which is defined in the following script. Finally, the train() method saves the model with the best accuracy on the validation set.
def evaluate(model, data_loader,  device):

    all_labels = []
    all_preds = []
    total_loss = 0.0

    with torch.no_grad():

        for i, batch in enumerate(data_loader):

          image_encodings,  labels = batch
          pixel_values = image_encodings.pixel_values
          pixel_values = pixel_values.squeeze()
          pixel_values = pixel_values.to(device)

          labels = labels.to(device)

          optimizer.zero_grad()

          logits = model(pixel_values)

          loss = criterion(logits, labels)
          total_loss += loss.item()

          preds = (logits > 0.5).float()
          all_labels.append(labels.cpu().numpy())
          all_preds.append(preds.cpu().numpy())

    all_labels = np.concatenate(all_labels, axis=0)
    all_preds = np.concatenate(all_preds, axis=0)

    loss = total_loss / len(data_loader)
    accuracy = accuracy_score(all_labels, all_preds)
    f1 = f1_score(all_labels, all_preds)
    return loss, accuracy, f1, all_labels, all_preds
I trained the model for two epochs using the following script. It already gives very impressive results.
num_epochs = 2
train(model, train_loader, val_loader, optimizer, criterion, device, num_epochs)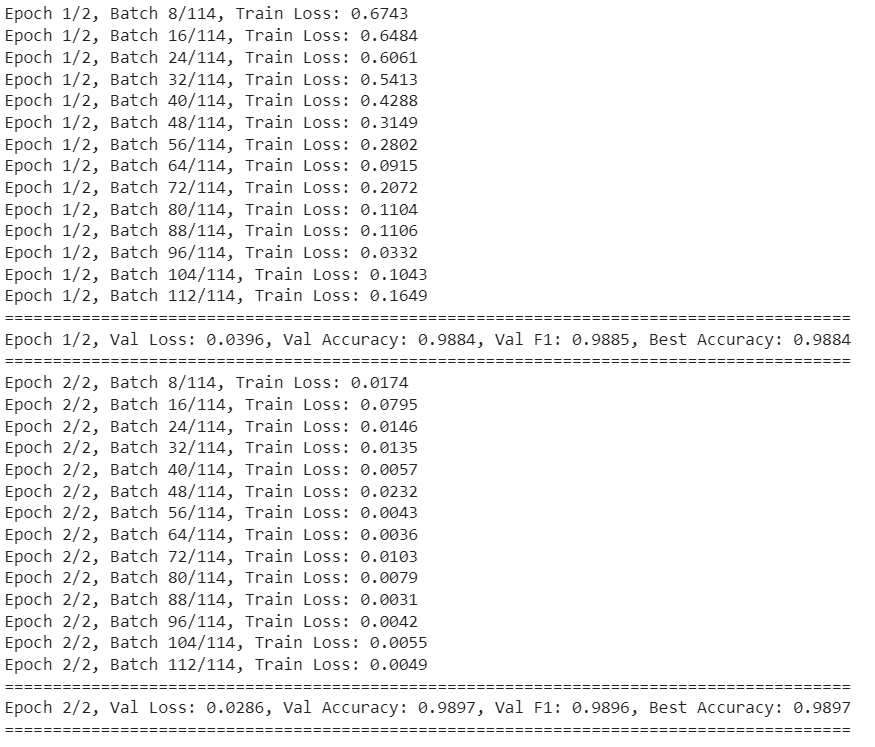
The last step is to evaluate the model on the test set. To do so, you can import the model with the best accuracy, which we saved using training, and pass it to the evaluate() method, along with the test dataset.
state_dict = torch.load('best_model.pt')

# Create a new instance of the model and load the state dictionary
num_labels = 1
model = ImageClassifier(num_labels, encoder).to(device)
model.load_state_dict(state_dict)

_, _, _, all_labels, all_preds = evaluate(model, test_loader, device)


print(classification_report(all_labels, all_preds))
print(accuracy_score(all_labels, all_preds))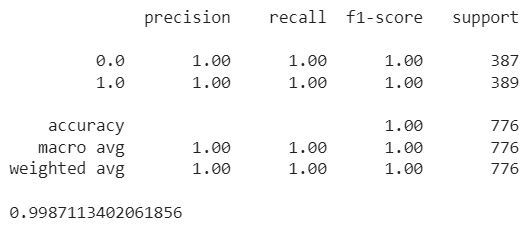
The output shows we get 99.87% accuracy on the test set. Impressive?
Conclusion
Training Vision Transformers using PyTorch models can be challenging due to the lack of detailed information in the official documentation. This article provides a step-by-step guide on fine-tuning a Vision Transformer from Hugging Face in PyTorch. Following these instructions, you can create your image classification models using Hugging Face transformers. If you have any feedback or questions, feel free to share them.