In this article, you will learn how to track faces within a video using the Python DeepFace library. Additionally, you'll discover how to include portions of the video background in face tracking by implementing custom methods that utilize the DeepFace library's extract_faces() method for face extraction.
I explained how to extract faces from videos using the Python DeepFace library in [one of my previous articles. However, I recently encountered a couple of issues when working with DeepFace's extract_faces() method:
- This method does not allow the extraction of portions of the face background. It also sometimes ignores the boundary features of a face, such as ears, hair, etc.
- Videos created by stitching together faces extracted by DeepFace are often jittery, as the extracted frames frequently miss some boundary facial features.
In this article, I provide solutions to these two problems.
It is pertinent to mention that OpenCV library provides functionalities for video tracking. However, they use very naive methods, which are less accurate than deep learning methods provided by the DeepFace library. Hence, I preferred DeepFace over OpenCV.
Installing and Importing Required Libraries
The following script installs the DeepFace and MoviePy libraries. The DeepFace library will be used to extract faces from videos. You will use the MoviePy library to create a modified video that contains facial regions by stitching together individual image frames.
! pip install deepface
! pip install moviepy
The script imports the Python libraries required to run the code in this article.
import cv2
from matplotlib import pyplot as plt
from deepface import DeepFace
import numpy as np
from moviepy.editor import *
import math
Let's first briefly revise how the DeepFace library detects faces in images.
How DeepFace Library Detects Faces
You can use the DeepFace.extract_faces() method to extract faces from images. You need to pass the deep learning model that you want to use to the detector_backend attribute.
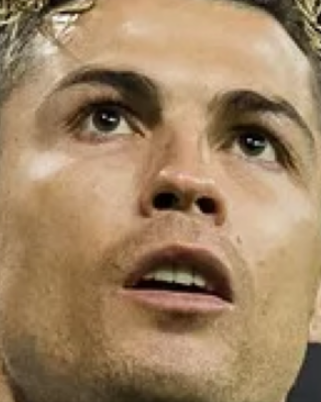
As an example, we will extract faces from the following image:

The following script detects faces using the retinaface model.
The extract_faces() method returns a list of detected faces. Each item in the list consists of a dictionary containing three keys: face, facial_area, and confidence. You can display a face using the face key.
image_path = r"/content/ronaldo.jpg"
image = cv2.imread(image_path)
face = DeepFace.extract_faces(img_path = image_path,
        target_size = (224, 224),
        detector_backend = "retinaface"
)

plt.imshow(face[0]['face'])
Output:

From the above output, you can see the detected face. You can see that the boundary features of the face, e.g., ears and hair, are not displayed. Also, the image is vertically aligned.
This results in the jittery effect when you stitch videos using these detected frames, as shown in the following video:
Output:
A better approach is to display the fully detected image using the image coordinates extracted via the facial_area key of the extract_faces method. The following script displays the facial area coordinates detected by the extract_faces method in the previous script.
print(face[0]['facial_area'])
Output:
{'x': 570, 'y': 130, 'w': 130, 'h': 163}
Next, you can extract the area from the original image using these facial area coordinates, as shown in the following script.
# Calculate the new coordinates, ensuring they do not exceed the image bounds
x1 = face[0]['facial_area']['x']
y1 = face[0]['facial_area']['y']
x2 = face[0]['facial_area']['x'] + face[0]['facial_area']['w']
y2 = face[0]['facial_area']['y'] + face[0]['facial_area']['h']

# Extract the region of interest (ROI) with the additional margin
sub_img = image[y1:y2, x1:x2]

# Convert the image from BGR to RGB for displaying with matplotlib
sub_img = cv2.cvtColor(sub_img, cv2.COLOR_BGR2RGB)

plt.imshow(sub_img)
Output:
You can see that the boundary features are also slightly detected. However, this may not be enough, and you may want to detect more areas around the face. I have developed a script that does this precisely, as seen in the following sections.
Frame Size Normalization
The first step is to normalize the image size of all the frames detected in a video. This is because Moviey's ImageSequenceClip method, which stitches video frames, expects all frames to be of the same size.
The following script defines the size_normalization method that first finds the width and height of the largest frame in the video and then increases the width and height of the smaller frames to match the largest frame.
We will pass the list of frame dictionaries extracted by the extract_faces method to the size_normalization function.
import copy

def size_normalization(faces):
    updated_faces = copy.deepcopy(faces)

    # Find the dimensions of the largest face
    max_w = max(f['facial_area']['w'] for f in updated_faces)
    max_h = max(f['facial_area']['h'] for f in updated_faces)

    # Update each facial_area dictionary
    for f in updated_faces:
        delta_w = max_w - f['facial_area']['w']
        delta_h = max_h - f['facial_area']['h']

        # Center the face within the new dimensions
        f['facial_area']['x'] -= delta_w // 2
        f['facial_area']['y'] -= delta_h // 2
        f['facial_area']['w'] = max_w
        f['facial_area']['h'] = max_h

    return updated_faces
Adding Margins to Video Frames
Next, we define the crop_image_area function that adds the specified margin to each video frame and returns the cropped frame. We will pass facial area coordinates from our normalized frames to this method.
def crop_image_area(img, facial_area, margin):


    # Calculate the new coordinates, ensuring they do not exceed the image bounds
    x1 = max(facial_area['x'] - margin, 0)
    y1 = max(facial_area['y'] - margin, 0)
    x2 = min(facial_area['x'] + facial_area['w'] + margin, img.shape[1])
    y2 = min(facial_area['y'] + facial_area['h'] + margin, img.shape[0])

    # Extract the region of interest (ROI) with the additional margin
    sub_img = img[y1:y2, x1:x2]

    # Convert the image from BGR to RGB for displaying with matplotlib
    sub_img = cv2.cvtColor(sub_img, cv2.COLOR_BGR2RGB)

    return sub_img
Adding Padding to Video Frames
When adding margins, the new width or height may become larger than the original image width or height. To handle such cases, we will pad the image frame with extra pixels using the pad_image_to_size function defined in the script below:
def pad_image_to_size(img, target_height, target_width):
    # Calculate the padding sizes
    top_bottom_padding = (target_height - img.shape[0]) // 2
    left_right_padding = (target_width - img.shape[1]) // 2

    # Add extra pixel to the bottom or right side if needed
    bottom = top_bottom_padding + (target_height - img.shape[0]) % 2
    right = left_right_padding + (target_width - img.shape[1]) % 2

    # Pad the image
    padded_img = cv2.copyMakeBorder(img, top_bottom_padding, bottom, left_right_padding, right, cv2.BORDER_CONSTANT, value=[0, 0, 0])
    return padded_img
Track Faces from Videos with Margins
Now, we are ready to track faces from videos with margins. We define the get_facial_frames method that accepts the video path, the output directory, and the margin values for the detected faces in the video.
The cv2.VideoCapture method reads frames from the input video. Each frame is passed to the extract_faces method for face detection. If a face is detected with an accuracy greater than 99%, we add the facial area and the original image frame to a dictionary and append the dictionary to the faces list.
Next, we pass this list of dictionaries to the size_normalization function, which makes all frames of equal sizes.
Then, we add margins to the image frames by passing the facial area coordinates of each frame to the crop_image_area function.
Subsequently, we pad all image frames using the pad_image_to_size function.
As a last step, we stitch all padded_images frames using the ImageSequenceClip function and save the video in the output directory.
Here is the script for the get_facial_frames method.
def get_facial_frames(video_path, directory, margin):
    # Initialize an empty list to store facial frames
    faces = []

    # Open the video file for processing
    cap = cv2.VideoCapture(video_path)

    # Get and round up the frames per second (fps) of the video
    fps = cap.get(cv2.CAP_PROP_FPS)
    fps = math.ceil(fps)

    # Initialize frame index and count of captured frames
    frame_index = 0
    captured_frame_count = 0

    # Extract the base name of the video file
    path = os.path.basename(video_path)

    # Process each frame of the video
    while cap.isOpened():
        ret, frame = cap.read()

        # Break the loop if no frame is returned
        if not ret:
            break

        try:
            # Extract facial properties from the frame
            face_props = DeepFace.extract_faces(img_path=frame, target_size=(224, 224),
                                                detector_backend="retinaface", enforce_detection=False)
            if face_props:
                # Check if the confidence level of the detected face is high enough
                confidence = face_props[0]['confidence']
                if confidence > 0.990:
                    # Store the frame and facial area if confidence is high
                    facial_area = face_props[0]['facial_area']
                    features_dict = {"frames_org": frame, "facial_area": facial_area}
                    faces.append(features_dict)
                    captured_frame_count += 1
        except Exception as e:
            # Print error if processing a frame fails
            print(f"Error processing frame at index {frame_index}: {e}")

        # Print progress every 10 frames
        if captured_frame_count % 10 == 0:
            print(f"Total frames processed: {captured_frame_count}")

        frame_index += 1

    # Normalize the size of all facial frames
    faces = size_normalization(faces)

    # Crop and add margins for facial images from the original video frames
    sub_images = []
    for f in faces:
        img = f['frames_org']
        facial_area = f['facial_area']
        sub_image = crop_image_area(img, facial_area, margin)
        sub_images.append(sub_image)

    # Determine the maximum height and width among all images
    max_height = max(img.shape[0] for img in sub_images)
    max_width = max(img.shape[1] for img in sub_images)

    # Pad all images to the same size
    padded_images = [pad_image_to_size(img, max_height, max_width) for img in sub_images]

    # Create a video clip from the padded images
    clip = ImageSequenceClip(padded_images, fps=fps)

    # Save the video file to the specified directory
    final_path = directory + path
    clip.write_videofile(final_path)

    # Return the list of padded images
    return padded_images
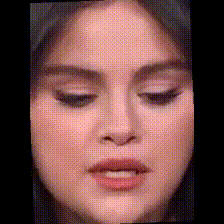
The following script tracks faces in a sample video with a margin of 50 pixels on each side. You can change margin values if you want.
margin = 50
video_path = r"/content/selena-gomez.mp4"
destination_directory = r"/content/processed_video/"
faces = get_facial_frames(video_path, destination_directory, margin)
Output:
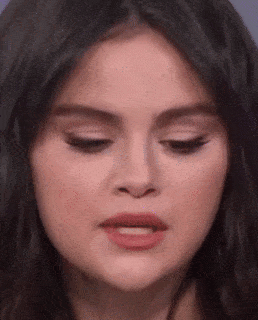
From the above output, you can see that some area around the facial region is also extracted, and the video is less jittery compared to the one extracted via the simple extract_faces function.
Conclusion
In this article, we discussed the challenges of face extraction when using the Python DeepFace library and how to solve them using custom Python methods. You learned how to improve the accuracy and visual quality of face tracking, overcoming the limitations of DeepFace's extract_faces() method, particularly in capturing boundary features and reducing jitter in video outputs.
If you have any feedback or comments, please feel free to share.
