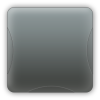
In this tutorial you will learn how to create a stylish looking content box for your website. Before you start, however, you will need to have two custom patterns which should each be from a 5*5px image that just has a pencil line drawn diagonally across it. You need to create one of these with the pencil line color #000000 and one with #1b9a1b.
1) In Photoshop create a new document, sized 900*900px, and with a transparent background. You are creating a box that is so big so that you can use it for any piece of content simply by resizing it.
2) Fill the first layer in white for visibility purposes by using the Paint Bucket tool.
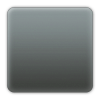
3) Now create a new layer and select the rounded rectangle tool. Set the radius to 60px, the color fill is not important for now. Your image should look like this:
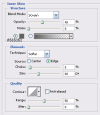
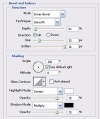
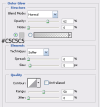
4) You need to add some layer styles to this, so right click on this layer within the layer pallet and select blending options, then add the following styles using the colors as typed on the images below:
5) Now you have the basic look of the box itself and you could just leave it there. However, you are going to add more detail to the content box before you are finished. Your image should now look something like this:
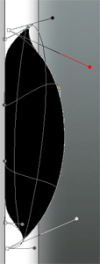
6) Create a new layer and select the rounded rectangle tool, because you are going to add some detail to each side of the box. You need to drag a rectangle out so that only half of it is inside the content box and then select the move tool, click on the centre of the bounding box, right click in the bounding box and select warp. You will now be able to deform the shape to how you want it to look, remember that anything outside of the content box you will be getting rid of.
7) Click the tick and use the normal move tool to make it the perfect size before right clicking on this layer in the layer pallet and selecting rasterize layer. 8) Now select the rectangle marquee tool and use this to cut out all of the shape that exists outside of the content box as follows:
9) It is highly likely that some of your shape will still exist outside of the canvas, in which case select the crop tool and drag it out so it covers the whole of your canvas but does not go outside it. Click the tick and you will have your shape on its own with no other bits. 10) You now need to duplicate this layer so go to the layer pallet and right click on the layer containing your shape and select duplicate layer. In fact, do this twice and name your original shape layer as ‘left shape’ with one of your duplicates ‘right shape’ and the other ‘bottom shape.’ 11) You need to place these layers on the sides that their names correspond to by selecting the layer called ‘right shape’ and clicking edit>transform>Flip Horizontal. Then use the move tool and the arrow keys on your keyboard, as this is most accurate, to move it over to the right hand side of your content box. 12) Select the layer called ‘bottom shape’ and click edit>transform>rotate 90° CCW then use the move tool to move it to the centre of the bottom of your content box. 13) Your shapes will probably be black or another pretty boring color, so select the layer called ‘left shape’ and drag the fill arrow down to 0%.
14) Select the blending options for this layer and use the following settings:
15) Click OK. The left shape should now look a lot better so you can now copy this to the other two layers by right click on the ‘left shape’ layer and selecting ‘copy layer styles’ then right clicking on each of the other two layers and selecting ‘paste layer styles’. Your finished content box should look something like this:
