Introduction
This tutorial teaches you how to create a Spring Boot application that provides RESTful API Endpoints. These endpoints are best consumed by other applications or for integrating with a SPA (Single Page Application) frontend such as Angular.
For the purpose of this tutorial, we will create a web service for managing students and their grade(seniority) for a highschool. I will refer to the application as App from now on.
Goals
At the end of this tutorial, you would have learned:
- How to create a Spring Boot project.
- How to create a @RestController to handle HTTP requests.
- How to create a @Service to perform business logic.
- How to create a @Repository to perform CRUD operations.
Prerequisite Knowledge
- Basic Java knowledge, especially with Java Annotations.
- Basic understanding of Dependency Injection.
- Basic understanding of HTTP requests.
- Familiarity with at least one Java IDE such as Eclipse, IntelliJ, Visual Studio Code(with Java extensions), or Netbeans, etc.
- Basic SQL or JDBC.
Tools Required
- Eclipse IDE for Java Developers, version 2021‑06 R. Although IntelliJ is the most popular Java IDE right now, Spring integration in IntelliJ requires the non-free Ultimate edition. I chose to stick with Eclipse to ensure that most of my readers can follow the tutorial for free.
- Postman API Client. The free tier is enough for this tutorial.
Spring Initilizr
For new Spring projects, the recommended way is to use Spring Initilizr.
https://start.spring.io/ is an official Spring website that generates Spring project files for you. You can quickly choose the dependencies that you want as well as setting project metadata. Even if a lot of IDEs support creating Spring projects locally or via a plugin, such as Spring Tools, I still prefer using the official web based Spring Initilizr if I want the latest version. For that reason, my instructions will be based on the web version.
Follow the instructions below to generate our project files:
- Go to https://start.spring.io/
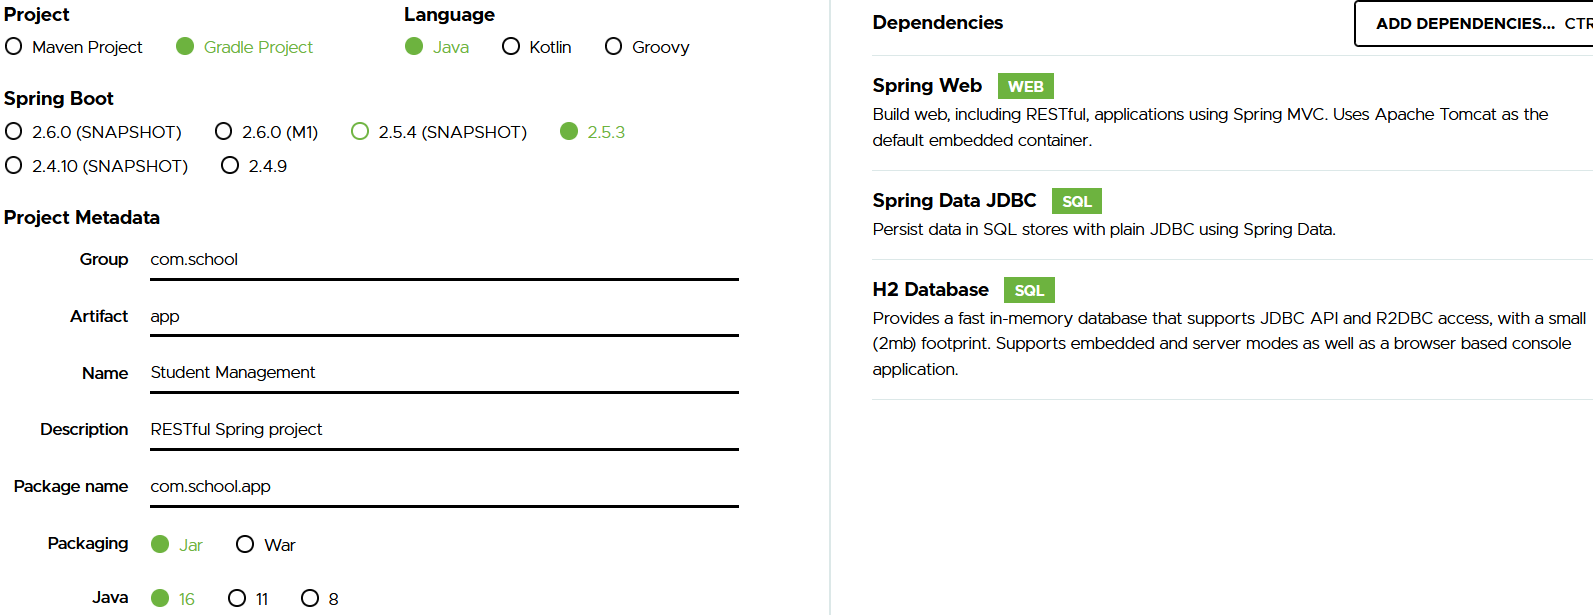
- Under Project, select Gradle (or Maven if you are familiar with it. For brevity, I will stick to Gradle in this tutorial).
- Under Language, select Java.
- Under Spring Boot, select version 2.5.3, which is the latest stable version.
- Under Project Metadata, modify the default Group to com.school
- For Artifact, change to app
- For Name, change to Student Management
- For Description, change to RESTful Spring project
- You should see the Package name already set to the correct package name of com.school.app
- For Packaging, select Jar
- For the Java version, select 16
- On the right hand side, you will see the Add Dependencies button, select it and add the following dependencies:
- Spring Web.
- Spring Data JDBC.
- H2 Database.
Your Spring Initilizr should now look like the screenshot below.
Click on the Explore button to inspect the project file structure and the generated build.gradle file. The content should be the same as my build.gradle file.
    plugins {
    id 'org.springframework.boot' version '2.5.3'
    id 'io.spring.dependency-management' version '1.0.11.RELEASE'
    id 'java'
    }
    group = 'com.school'
    version = '0.0.1-SNAPSHOT'
    sourceCompatibility = '16'
    repositories {
    mavenCentral()
    }
    dependencies {
    implementation 'org.springframework.boot:spring-boot-starter-data-jdbc'
    implementation 'org.springframework.boot:spring-boot-starter-web'
    runtimeOnly 'com.h2database:h2'
    testImplementation 'org.springframework.boot:spring-boot-starter-test'
    }
    test {
    useJUnitPlatform()
    }
Click on Generate at the bottom left of the screen to download the generated profile files.
Extract the app folder inside the zip file. The files inside the app folder should be the same as the screenshot below.

Import project files into Eclipse
-
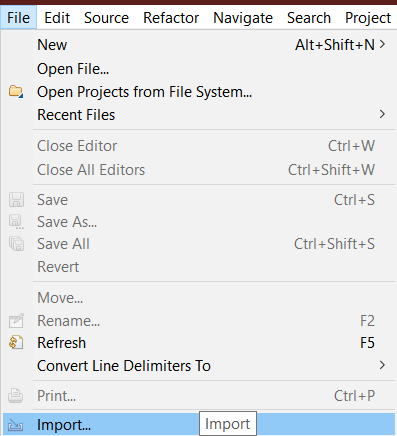
In Eclipse, click on Files -> Import
-
Expand Gradle -> Existing Gradle Project -> Next

-
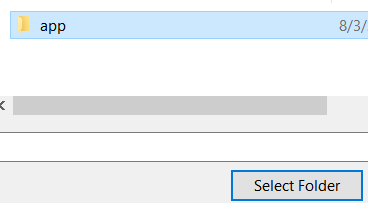
For Project root directory, select Browse, then find and select the lowermost app folder (but not go inside of it) > Select Folder
-
The Project root directory should now be similar to this path:
C:\Users\username\Downloads\app\app -
Click Next.
-
On the next screen, you can skip overriding project workspace settings, and click Next again. After you click Next here, Eclipse will take some time to configure your project.
-
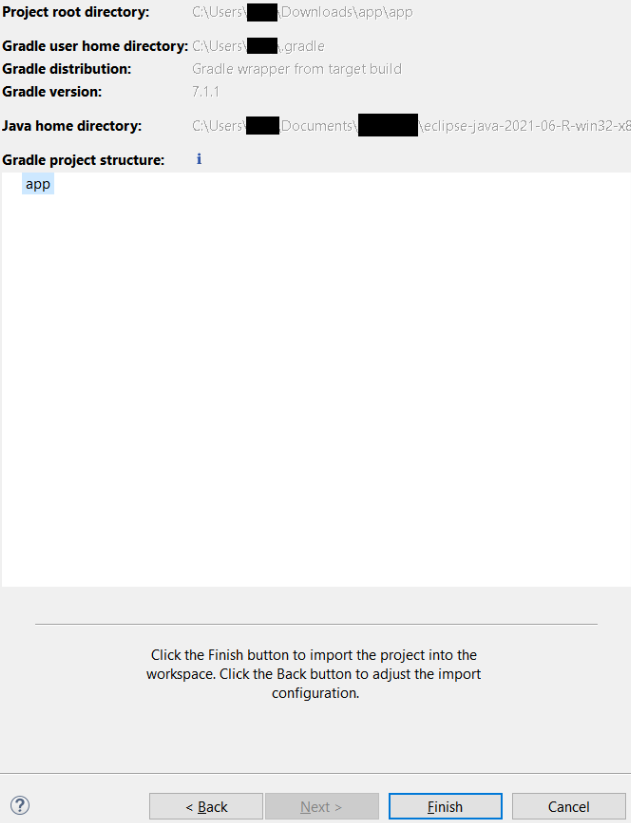
You should now see this screen.
-
Click Finish and wait for Eclipse to build your project dependencies.
-
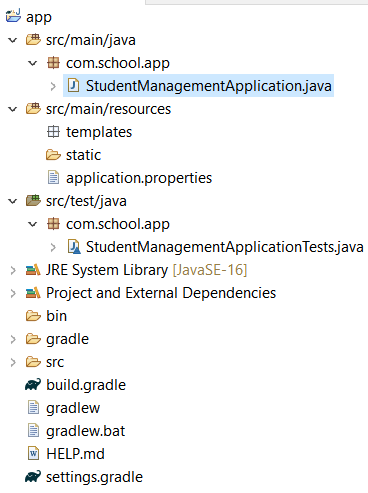
Once the dependencies are done building, you should see your project below with a similar directory structure.
-
At the bottom of Eclipse, there is a tab called Gradle Tasks. You will find pre-built Gradle tasks(run, test, create jar) that Spring Initilizr built for you, so you don’t have to configure run configurations yourself. If you cannot see the Gradle Tasks tab, then you can go to Window -> Show View -> Other -> Gradle Tasks to enable it.
-
Now expand the application folder under Gradle Tasks, then double click on the task bootRun.

-
Although the App does not do much yet, you should still see Spring Boot starting in the Console view.
Started StudentManagementApplication in 2.338 seconds (JVM running for 2.812)
The Object Models
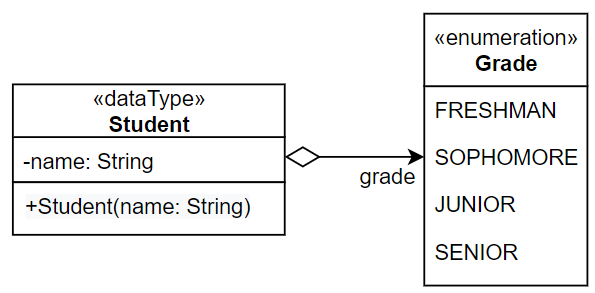
Because we want to focus on creating a RESTful API, it is best to keep our object models simple and easy to understand. We will only need two POJOs(Plain Old Java Object) for our App:
- The Student class contains 3 fields: the name of the student and the grade that they belong to.
- The Grade enum, with each constant representing a specific grade.
The UML diagram below depicts the relationship between Student and Grade.
Creating POJOs
Now that we understand how our object models, let us create the Java classes for them with the steps below.
-
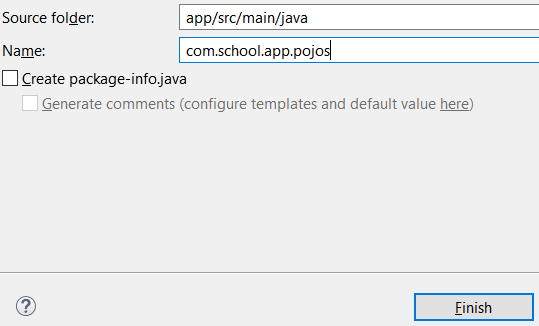
Create the com.school.app.pojos package. We can create a new package by right-clicking on the com.school.app package -> New -> Package

-
Inside the New Java Package wizard, type in com.school.app.pojos for the Name field, and then click Finish.
-
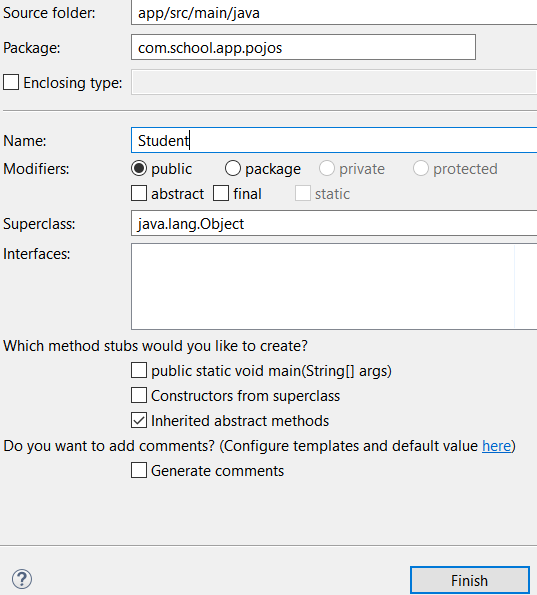
Inside the pojos package that we just created, create a new Class by right-clicking on the package -> New -> Class

-
Type in Student for the Name field, and then click Finish.
-
You do not have to write any code for the Student class for now. We need to go ahead and create the Grade enum first. Right click on the pojos package again -> New -> Enum.

-
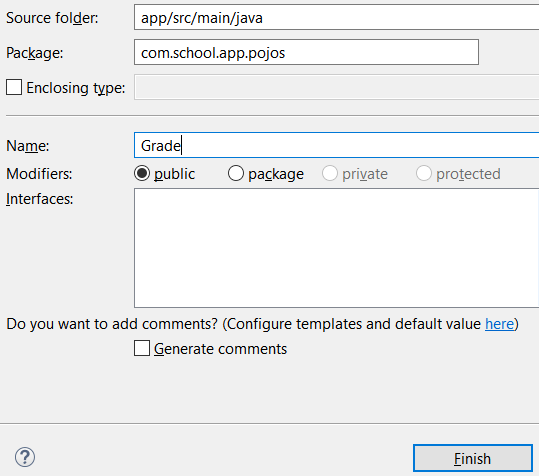
For the Name, put in Grade and click Finish
-
You will see an empty enum created, you can add in the constants yourselves, or you can copy the whole enum class here:
 package com.school.app.pojos;

 public enum Grade {
     FRESHMAN, SOPHOMORE, JUNIOR, SENIOR
 }
Now copy the content of the Student class from the source code below.
package com.school.app.pojos;

import java.util.Objects;

import com.fasterxml.jackson.annotation.JsonProperty;

public class Student {
    private final String name;
    private final Grade grade;

    public Student(
            @JsonProperty("name")String name,
            @JsonProperty("grade")Grade grade) {
        this.name = name;
        this.grade = grade;
    }

    public String getName() {
        return name;
    }

    public Grade getGrade() {
        return grade;
    }

    @Override
    public int hashCode() {
        return Objects.hash(grade, name);
    }

    @Override
    public boolean equals(Object obj) {
        if (this == obj)
            return true;
        if (obj == null)
            return false;
        if (getClass() != obj.getClass())
            return false;
        Student other = (Student) obj;
        return grade == other.grade && Objects.equals(name, other.name);
    }

    @Override
    public String toString() {
        return "Student [name=" + name + ", grade=" + grade + "]";
    }

}
The Front Controller Pattern
Before going further, we need to discuss one of our project dependencies, Spring Web MVC.
Even though the acronym MVC is in the name, Spring Web MVC is designed around the Front Controller Pattern, where a central DispatcherServlet sits in the front of the application intercepting requests.
Business logic, persistency, and view rendering would be delegated to other components, namely:
- Business logic would be performed by the Service layer.
- CRUD operations would be performed using the Repository layer.
- View resolution would be performed by the View layer.
Most of the time, the View layer is only used for rendering web pages for Multi-Page Application(MPA) frontends. Because our App mostly sends and receives HTTP requests and responses, we would not need a View layer for this tutorial, but we are still going to need a Service(Business) layer and a Repository(Persistence) layer.
Below is an over-simplified diagram of our App architecture.
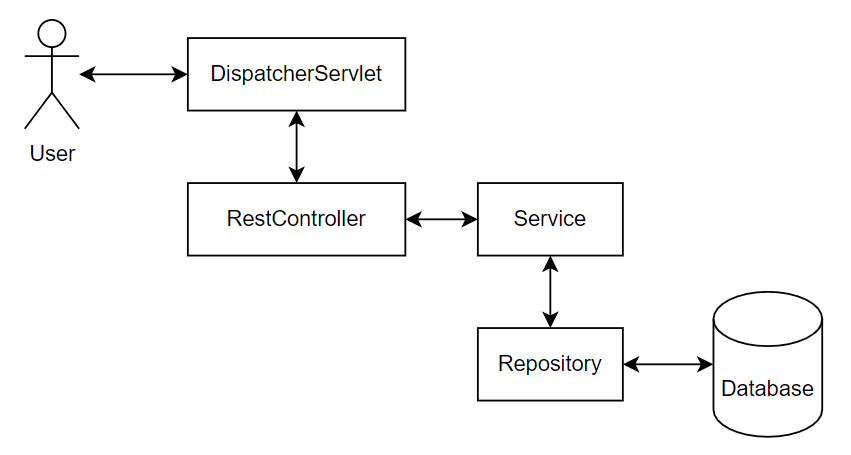
Please note that I skipped over a lot of components, but I am only able to do that because Spring Boot already abstracted a lot of boilerplate code and configurations.
Even though Spring Boot allows developers to create web applications with just a few lines of code, a lot of developers would agree that Spring Boot performs too much “magic” and it can be hard to understand what is going on behind all of the abstractions. The chart above should be enough to provide a rough mental image that corresponds with the classes we will create later.
Creating the Controller, Service, and Repository
Because we already went over how to create packages and classes, I will skip the IDE specific instructions from now on. Let us create our Controller, the Service layer, and the Repository layer by following the steps below.
Create 3 packages:
- com.school.app.controllers
- com.school.app.services
- com.school.app.repos
Insides these newly created packages, create 3 classes:
- com.school.app.controllers.CustomRestController
- com.school.app.services.CustomService
- com.school.app.repos.CustomRepo
Create an empty file under src/main/resources with the name schema.sql
Paste the content below into CustomRestController.
    package com.school.app.controllers;

    import org.springframework.beans.factory.annotation.Autowired;
    import org.springframework.web.bind.annotation.DeleteMapping;
    import org.springframework.web.bind.annotation.GetMapping;
    import org.springframework.web.bind.annotation.PostMapping;
    import org.springframework.web.bind.annotation.RequestBody;
    import org.springframework.web.bind.annotation.RequestParam;
    import org.springframework.web.bind.annotation.RestController;

    import com.school.app.pojos.Student;
    import com.school.app.services.CustomService;

    @RestController
    public class CustomRestController {

        @Autowired
        private CustomService service;

        @PostMapping("/addStudent")
        public void addStudent(@RequestBody Student student) {
            service.addStudent(
                    student.getName(),
                    student.getGrade());
        }

        @GetMapping("/getStudent")
        public Student getStudentByName(@RequestParam("name") String name) {
            return service.getStudentByName(name);
        }

        @DeleteMapping("/removeStudent")
        public void deleteStudentByName(@RequestParam("name") String name) {
            service.deleteStudentByName(name);
        }

    }
Paste the content below into CustomRepo.
    package com.school.app.repos;

    import java.sql.ResultSet;
    import java.sql.SQLException;

    import org.springframework.beans.factory.annotation.Autowired;
    import org.springframework.jdbc.core.JdbcTemplate;
    import org.springframework.jdbc.core.RowMapper;
    import org.springframework.stereotype.Repository;

    import com.school.app.pojos.Grade;
    import com.school.app.pojos.Student;

    @Repository
    public class CustomRepo {

        @Autowired
        private JdbcTemplate jdbcTemplate;

        public int insertStudent(String name, Grade grade) {
            return jdbcTemplate.update(
                    "INSERT INTO students (name, grade) VALUES (?, ?)",
                    name, grade.toString());
        }

        public Student getStudentByName(String name) {
            String query = "select * from students where name = ?";
            return jdbcTemplate.queryForObject(query, new StudentRowMapper(), name);
        }

        public int deleteStudentByName(String name) {
            return jdbcTemplate.update(
                    "DELETE from students WHERE name = ?", name);
        }
    }

    class StudentRowMapper implements RowMapper<Student> {
        @Override
        public Student mapRow(ResultSet rs, int rowNum) throws SQLException {
            var student = new Student(
                    rs.getString("name"),
                    Enum.valueOf(Grade.class, rs.getString("grade")));

            return student;
        }
    }
Paste the content below into CustomService.
    package com.school.app.services;

    import org.springframework.beans.factory.annotation.Autowired;
    import org.springframework.stereotype.Service;

    import com.school.app.pojos.Grade;
    import com.school.app.pojos.Student;
    import com.school.app.repos.CustomRepo;

    @Service
    public class CustomService {

        @Autowired
        CustomRepo repo;

        public void addStudent(String name, Grade grade) {
            repo.insertStudent(name, grade);
        }

        public Student getStudentByName(String name) {
            return repo.getStudentByName(name);
        }

        public void deleteStudentByName(String name) {
            repo.deleteStudentByName(name);
        }

    }
Paste the content below into schema.sql. This file allows Spring Boot to initialize the in-memory H2 database for us.
    create table students(
        name varchar_ignorecase(50) not null primary key,
        grade enum('FRESHMAN', 'SOPHOMORE', 'JUNIOR', 'SENIOR')
    );

    INSERT INTO students (name, grade) VALUES ('John', 'FRESHMAN');
    INSERT INTO students (name, grade) VALUES ('Mary', 'SOPHOMORE');
    INSERT INTO students (name, grade) VALUES ('Tom', 'JUNIOR');
    INSERT INTO students (name, grade) VALUES ('Jessica', 'SENIOR');
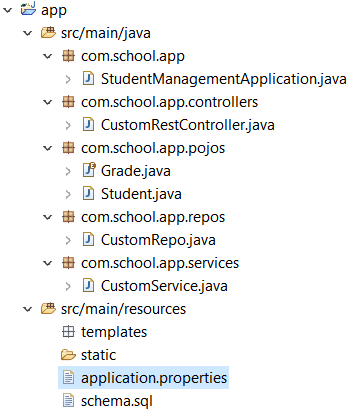
Here is how your project structure should look like at this step.
If the App is running, stop it by selecting the red stop button in the Gradle Executions tab.

After the App has been stopped, go ahead and start it again. If your App fails to start, please go back to the previous steps to ensure that you have done everything correctly.
HTTP Requests with Postman
Now that our backend is completed, we need to fire up some requests to make sure that it works correctly. Since Postman is a popular tool, a tutorial on it is out of scope for this tutorial. I am going to assume that you already know how to use it.
Our App starts at http://localhost:8080, so we need to create the following requests:
GET:
- localhost:8080/getStudent?name=John
- localhost:8080/getStudent?name=Mary
- localhost:8080/getStudent?name=Tom
- localhost:8080/getStudent?name=Jessica
- localhost:8080/getStudent?name=Rebecca
POST:
-
localhost:8080/addStudent
with json body{"name":"Rebecca","grade":"SOPHOMORE"}
DELETE:
- localhost:8080/removeStudent?name=Tom
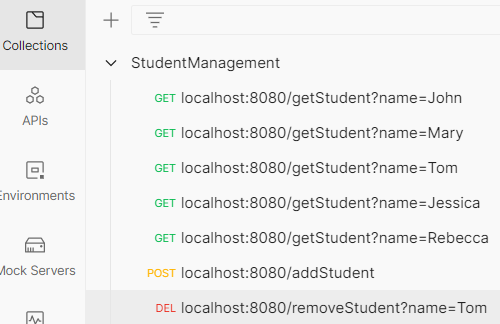
After you are done creating the requests, your screen should look similar to the screenshot below.
Test the App
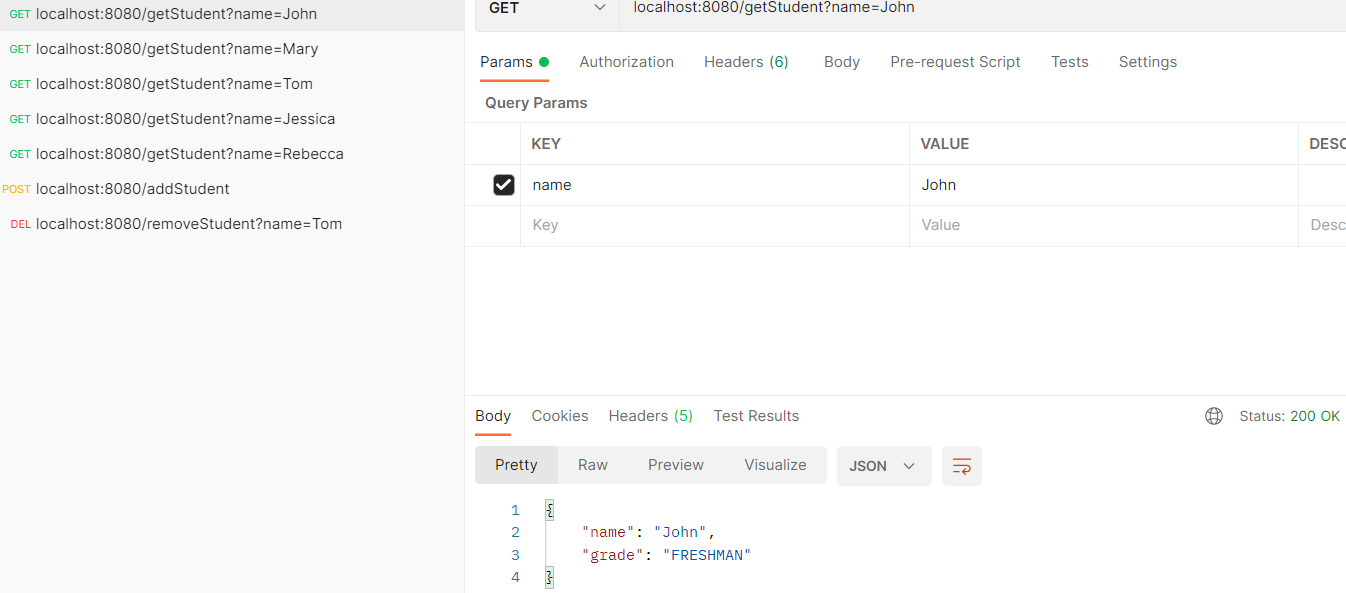
If we look back at the schema.sql file we created earlier, we already created 4 students in our database when the App was bootstrapping. The first 4 GET requests were created for them. If you execute these 4 GET requests, you should see the server responding with a json object representing the student and status 200.
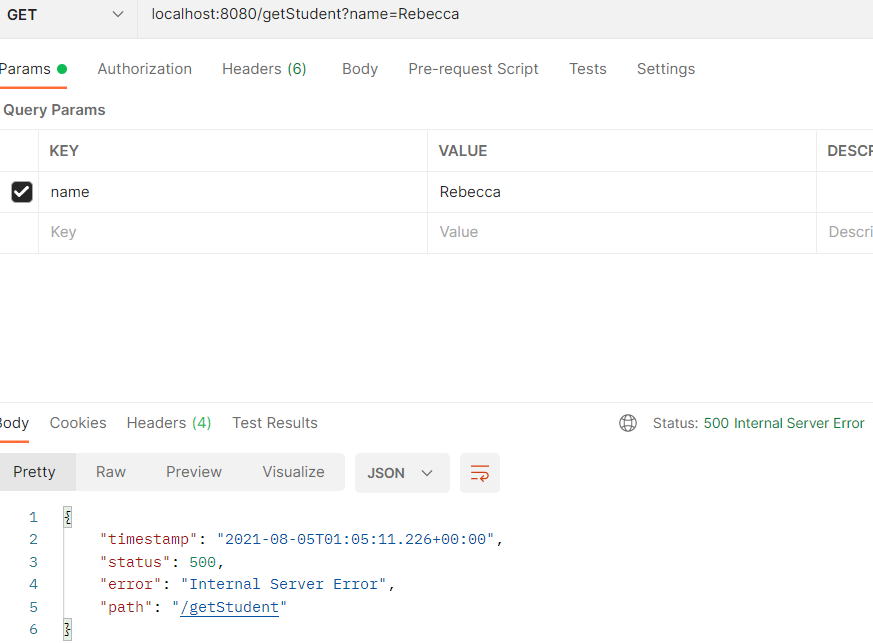
The 5th GET request was meant to query a student named Rebecca that is not in the database yet. If you query it now, you will receive an error code 500.
To be able to query Rebecca, we would have to add her to the database first with the POST request. Make sure to double check that the request body contains the json object before sending the request.

After your POST request is accepted by the server, you should be able to query her successfully.
Finally, we need to try out the DELETE request. This request utilizes the header parameters (just like the GET requests), so should be ready to go. Fire off the DELETE request, and then try to query for Tom again. Tom has been deleted with your DELETE request, so the server will return an error 500.
CAUTION
- The App that we created is only for demonstration purposes. It does not have the necessary security configurations to be a production server.
- The embedded H2 Database is in-memory only. Your data will not persist after application reboot.
Summary
Congratulations, you have completed the tutorial.
The source code used in this project is located in https://github.com/dmitrilc/DaniWebSpringBoot if you want to download the project files.