Reallusion is perhaps best known for developing a range of award-winning 3D cinematic tools, so it came as something of a surprise to discover that the company has just released an iPhone app. The surprise did not diminish any when the press release arrived on my desk and proudly, not to mention rather loudly, proclaimed that "Big Lens will turn your iPhone/iPad into a professional SLR camera". It has to be said that I pretty much choked on my coffee as, let's face it, you'd need something approaching a bone fide miracle to get anything approaching professional results from the extremely poor 0.7 megapixel camera to be found on the iPad 2. The iPhone 4, however, has a much better specced 5 megapixel camera with a backlit sensor design similar to that found in many high-end cameras. So I thought it was only fair to put the 'iPhone to DSLR' claims to the test using my iPhone 4.
The first thing I noticed after installing the Big Lens app was the sheer simplicity of the interface. Unlike many of the other photo-editing and tweaking tools I have used on my iPhone, this one is not a mish mash of myriad icons and menu options. Instead, Big Lens hits you with a start screen that asks you to either take a photo, use an image you've already shot or load a sample from the application itself. There are two other buttons on the main screen: Basic and Advanced which should be pretty self-explanatory.
Actually, I tell a lie as that's not quite the first thing you see as Big Lens will first load a series of seven images which serve as a quick tutorial as you swipe from one to the other. These cover everything from loading your images through to using the various tools. It's a really effective tutorial which means even the novice user can immediately grasp how to define a focus area, adjust the aperture, apply effects, customize glare shapes, add instant focus or blur and finally export your edited photographs by email, to Facebook, Dropbox or Picasa.
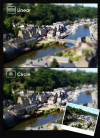
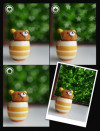
Hit the 'Basic' button and you are presented with a set of six icons underneath your image, namely: aperture, filter, lens, circle, linear and compare. The aperture tool lets you choose between applying a post-aperture setting of F3.25, F3.2, F2.8, F2.0 and F1.8 to your image at the touch of a finger. The filter tool brings a number of post processing filters such as Lomo, Flare, Warm, Vivid, Gray, Cold, Red Sepia, Blue Sepia, Green Sepia, Black & White, Pop Warm, Dark and bog standard old-fashioned Sepia. The lens tool applies a number of, frankly, rather superfluous effects in my opinion. I cannot imagine wanting to turn light reflections in the background of my photos into small love hearts or stars for that matter, but each to their own. I'm not sure these really gel with the 'professional' tag that Reallusion likes so much. Circle and Linear, meanwhile, refer to the area of the image to which the focus is applied. Which just leaves the button I like the best of all, compare. This does what other apps often leave as a buried menu option, which is bizarre as I would imagine that if you are tweaking an image the one thing you want to be able to do as quickly and easily as possible is see the differences between the original and the tweaked image before continuing or saving. That, my friends, is what the compare button dies in an instantly toggle between old and new fashion.
Back to the main screen and selecting the Advanced option just switches to a different set of tools but with the same intuitive interface as the Basic tools route. The new icons that are offered are: brush, eraser, lasso, auto and clear. None of which are, if I am to be honest, particularly advanced in the overall scheme of photo editing things. Hold the brush icon and a sliding sizer appears to let you change the size of the finger-controlled brush you get to use but unfortunately the iPhone screen is too small, and the brush options too limited, to be able to do anything other than very roughly choose any area to which you want to apply your basic editing effects. The lasso tool should be a better option, but suffers from the same accuracy problem as does the auto select option. In fact, these are so not advanced tools in my book that I wondered if the developers had got the Basic and Advanced categories the wrong way around. At least there is a sizeable eraser to get rid of what you've done. If you have a stylus of some sort you may get a more defined area using these tools, in which case you can quickly switch to the basic options and apply the effects there to just the part of the image you have selected. In theory it's great, in practise it's way too fiddly and uncertain to be classified as professional in any way.
Ironically, the finger gestures work much better on an iPad but are all but pointless as the iPad 2 camera is of such poor quality that even a powerful set of tweaks as offered by Big Lens are not enough to be able to save your images from being anything other than disappointing in the extreme. For this whole smart focus system to really work properly, I cannot help but feel that Reallusion need to rethink the basic control method for the iPhone screen. At the very least I would suggest that the sizing tool needs to allow for a much greater degree of granularity, dropping down to a smaller brush size might help in the accuracy stakes. But, ultimately, you have to forget those rather ludicrous claims of turning your iPhone into a professional SLR and instead just concentrate on the fact that for under a dollar you have a relatively easy to use tool that can tweak your photos and provide hours of fun in so doing. At the end of the day it's all about improving the images that you get from your camera, and Big Lens succeeds in doing just that for very little outlay and without any kind of learning curve for which it is to be applauded.
Here's a video demo of Big Lens for the iPhone in action
[youtube]cY7o5V6HbWE[/youtube]


