Introduction
In a previous tutorial, we learned how to create a notification on Android. In that tutorial, we did not have to request any permission because applications did not need permission to post notifications on Android 12 and below.
It has been almost a year since the release of that tutorial and Android 13 came along, bringing with it some important changes. Starting on Android 13 (Android API level 33), most applications will have notifications turned off by default.
In this tutorial, we will learn how to request permission from the user to turn on notification permission.
Goals
At the end of the tutorial, you would have learned:
- How to request notification permission on Android 13+.
Tools Required
- Android Studio. The version used in this tutorial is Android Studio Dolphin | 2021.3.1 Patch 1.
Prerequisite Knowledge
- Intermediate Android.
- Notification Basics.
Project Setup
To follow along with the tutorial, perform the steps below:
-
Create a new Android project with the default Empty Activity.
-
In the module build.gradle file, change the
compileSdkandtargetSdkto33. -
Add the vector asset below as ic_baseline_notifications_24.xml into the project’s
drawabledirectory. This will be used as the notification icon.<vector android:height="24dp" android:tint="#000000" android:viewportHeight="24" android:viewportWidth="24" android:width="24dp" xmlns:android="http://schemas.android.com/apk/res/android"> <path android:fillColor="@android:color/white" android:pathData="M12,22c1.1,0 2,-0.9 2,-2h-4c0,1.1 0.89,2 2,2zM18,16v-5c0,-3.07 -1.64,-5.64 -4.5,-6.32L13.5,4c0,-0.83 -0.67,-1.5 -1.5,-1.5s-1.5,0.67 -1.5,1.5v0.68C7.63,5.36 6,7.92 6,11v5l-2,2v1h16v-1l-2,-2z"/> </vector> -
Add the strings below into your project’s strings.xml file.
<string name="channel_id">123</string> <string name="channel_name">My Channel Name</string> <string name="notification_title">My Notification Title</string> <string name="notification_content">My notification content</string> <string name="permission_warning">Give me permission for core app functionality</string> -
Create a new value resource file for called ids.xml (inside
valuesdirectory). This file is commonly used for holding ID values. -
Add the notification ID below into this file.
<item type="id" name="notification_id"/> -
Add the
channelIdas a property in the class MainActivity.private val channelId by lazy { getString(R.string.channel_id) //Don't access me before resources are available. } -
Add the code below to create the notification.
private fun createNotification(): Notification { val icon = R.drawable.ic_baseline_notifications_24 val title = getString(R.string.notification_title) val content = getString(R.string.notification_content) return NotificationCompat.Builder(this, channelId) .setSmallIcon(icon) //required .setContentTitle(title) //required .setContentText(content) //required .build() } -
Add the code below to show the notification.
private fun showNotification() { val notificationId = R.id.notification_id val notification = createNotification() with(NotificationManagerCompat.from(this)) { notify(notificationId, notification) } } -
Update
onCreate()to call these functions.override fun onCreate(savedInstanceState: Bundle?) { super.onCreate(savedInstanceState) setContentView(R.layout.activity_main) createNotificationChannel() showNotification() }
Android 12 Does Not Need Notification Permission
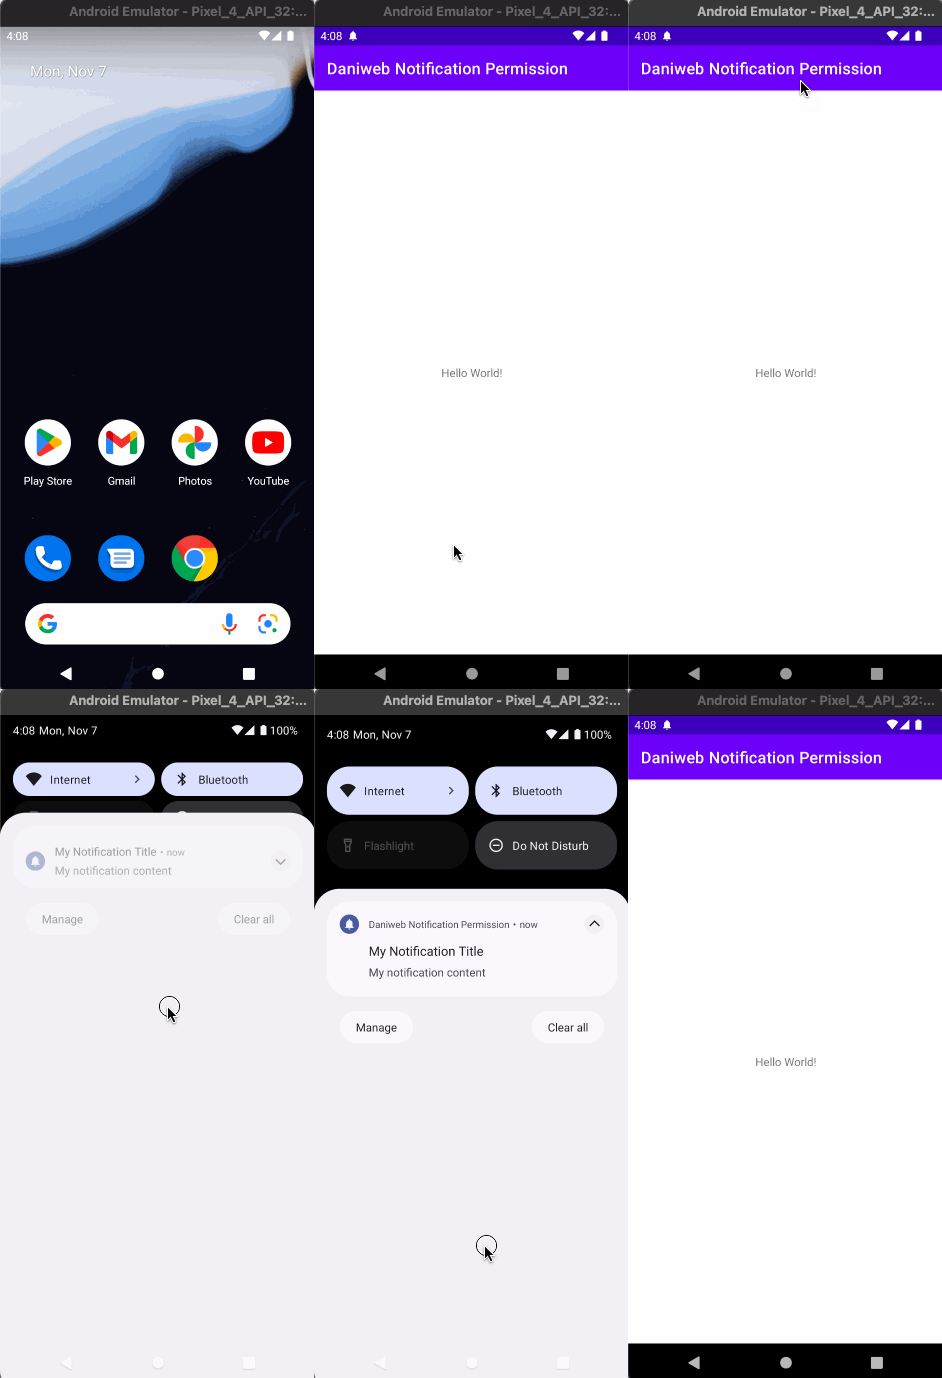
When running the app on Android 12, it works fine and properly show the notification, even without any permission.

Android 13 Can Ask For Permission Automatically
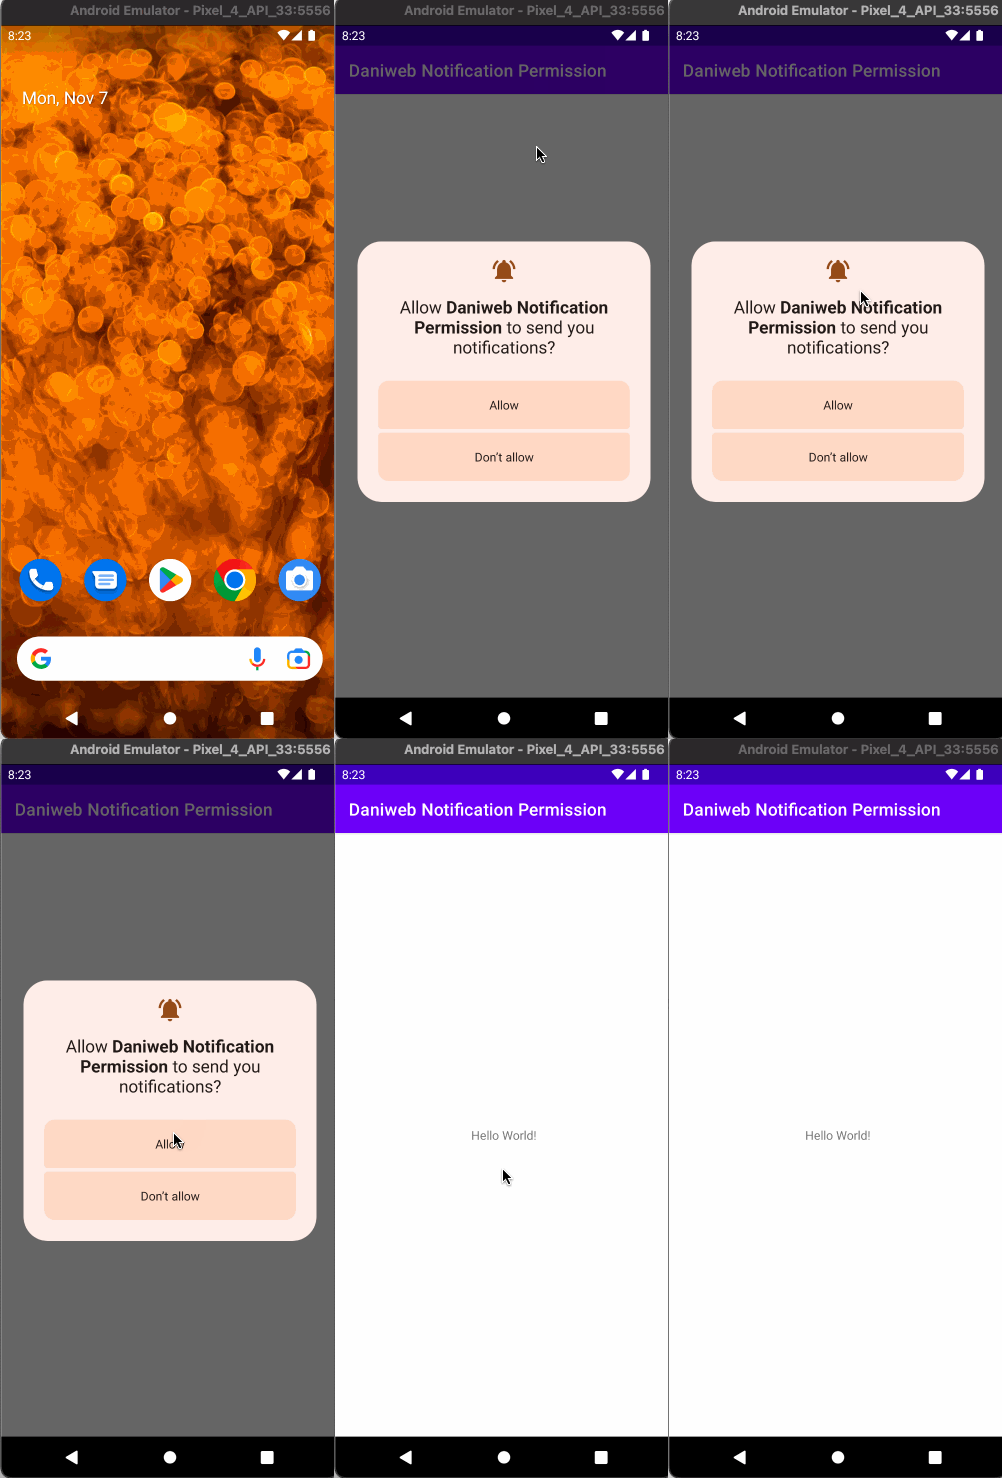
When running the same application on Android 13, the app behaves a bit differently. As soon as you create a notification channel, the app will ask the user for the notification permission.

From this point on, the app will be allowed to post notifications, until the permission is revoked by the user.
This behavior might seem convenient, but it has a few drawbacks:
- When the user revokes the notification permission, the system will not automatically ask for permission again. This means that you will have to implement app logic to check for this permission.
- You have little control about when the permission request is shown. If the permission is not asked at a sensible point during the user flow (out of context), then the user is more likely to give that permission. If the notification permission is asked right after installing or on first boot, it is unclear for the user to know why the permission is needed.
- You miss out on the opportunity to explain to the user why the notification permission is needed. Even though you are not allowed to customize the notification permission prompt that is generated by the system, you can still modify the app UI so that the permission makes sense for the user.
To solve the issues above, we need to:
- Checks for the permission before your app posts a notification and before creating the notification channel.
- Customize the UI to provide hints why your app needs this permission.
Declare Notification Permission In The Manifest
For the permission prompt to show up later, you will have to add the permission below to the manifest.
<uses-permission android:name="android.permission.POST_NOTIFICATIONS"/>Checking For Permission
To ensure that:
- The automatic permission prompt does not appear.
- We have permission before posting any notification.
We will need to add some code to check for the notification permission.
In MainActivity, add the function below to check for permission.
@RequiresApi(Build.VERSION_CODES.TIRAMISU)
private fun isNotificationPermissionGranted() =
   ContextCompat.checkSelfPermission(this, Manifest.permission.POST_NOTIFICATIONS) == PERMISSION_GRANTED
Now, we modify onCreate() a bit to check for existing permission.
override fun onCreate(savedInstanceState: Bundle?) {
   super.onCreate(savedInstanceState)
   setContentView(R.layout.activity_main)

   val permissionLauncher = registerForActivityResult(ActivityResultContracts.RequestPermission()){ isGranted ->
       if (isGranted){
           createNotificationChannel()
     showNotification()
       }
   }

   if (Build.VERSION.SDK_INT >= Build.VERSION_CODES.TIRAMISU) {
       if (isNotificationPermissionGranted()) {
           showNotification()
       } else {
           permissionLauncher.launch(Manifest.permission.POST_NOTIFICATIONS)
       }
   } else {
       showNotification()
   }
}
Whenever the permission check fails, we can either ask for the permission again, but be careful about doing this all the time because it is annoying for the user if they really wanted the permission to be off.
Delayed Permission Prompt
It is best that you show your permission prompt when it makes sense for the user, as well as teaching the user why your app needs the permission. As demonstration, let us bind the permission request to a click action instead of it prompting at app startup.
-
Add
android:idandandriod:textto the TextView in activity_main.xml.<TextView
android:id="@+id/textView"
android:layout_width="wrap_content"
android:layout_height="wrap_content"
android:text="@string/permission_warning"
app:layout_constraintBottom_toBottomOf="parent"
app:layout_constraintEnd_toEndOf="parent"
app:layout_constraintStart_toStartOf="parent"
app:layout_constraintTop_toTopOf="parent" /> -
Modify
oncreate()again to bind the permission prompt to the TextView.override fun onCreate(savedInstanceState: Bundle?) { super.onCreate(savedInstanceState) setContentView(R.layout.activity_main) val permissionLauncher = registerForActivityResult(ActivityResultContracts.RequestPermission()){ isGranted -> if (isGranted){ createNotificationChannel() showNotification() } } val textView = findViewById<TextView>(R.id.textView) textView.setOnClickListener { if (Build.VERSION.SDK_INT >= Build.VERSION_CODES.TIRAMISU) { if (isNotificationPermissionGranted()) { showNotification() } else { permissionLauncher.launch(Manifest.permission.POST_NOTIFICATIONS) } } else { showNotification() } } }
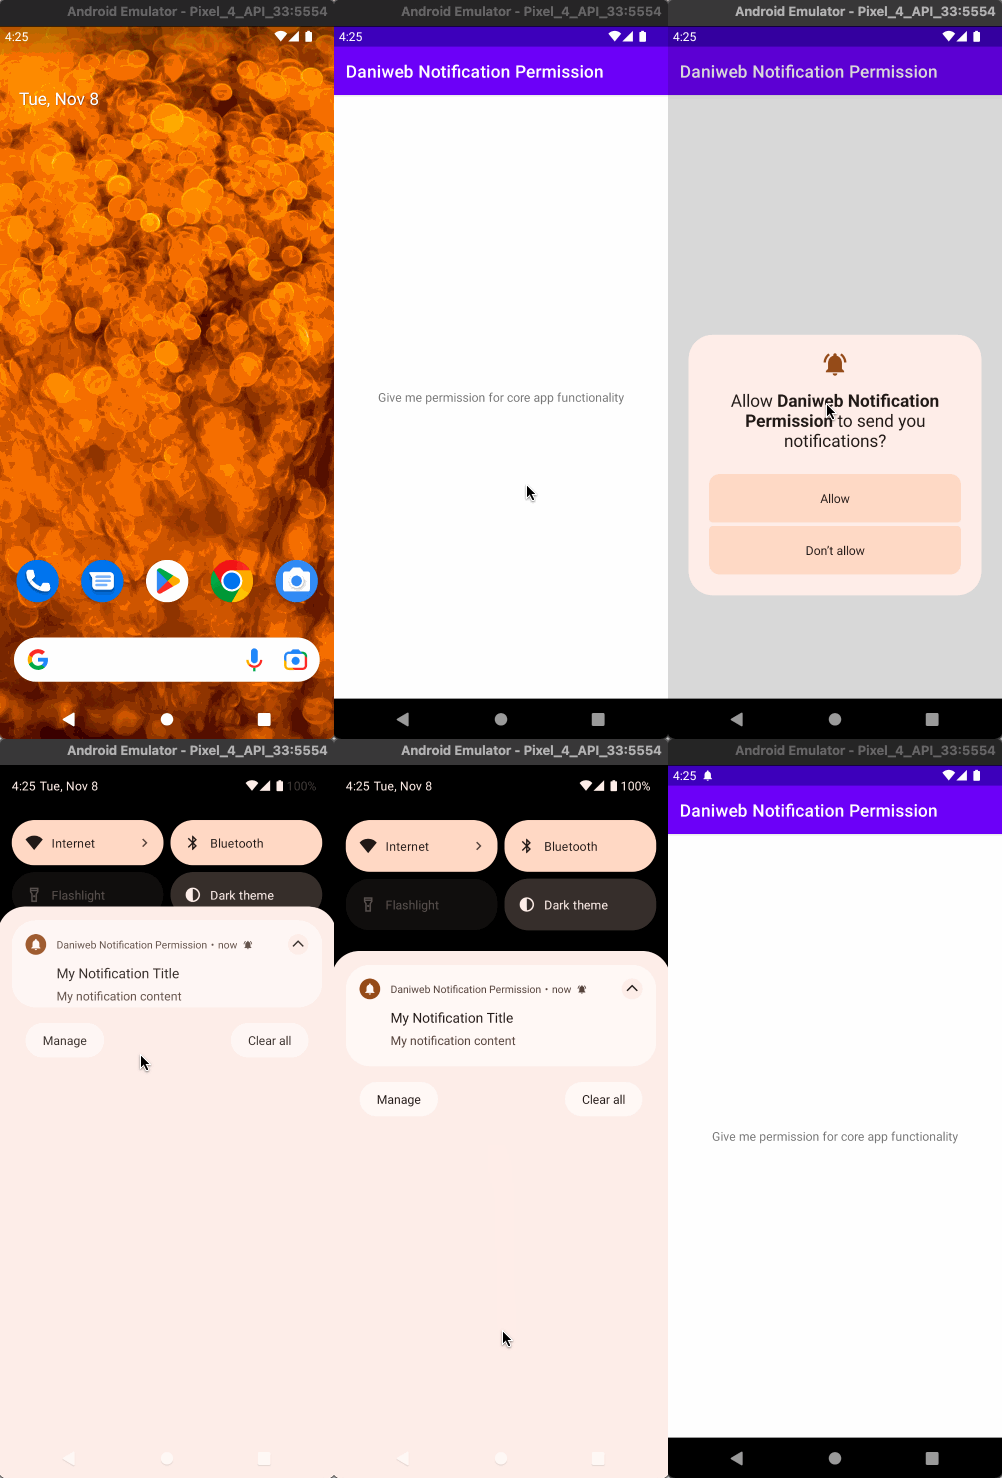
When we run the app now, it should behave similarly to the animation below.

Summary
We have learned how to request for notification permission on Android 13. The full project code can be found at https://github.com/dmitrilc/DaniwebNotificationPermission.
