This 'sticky' thread is for working examples of Python GUI code. Note that most wxPython examples have their own thread.

Please use comments in your code to help the reader.

The example code should be usable as a template, so folks get a feel for the toolkit and can use those examples/templates as a basis for more complex programs.

We also welcome code that compares the various GUI toolkits.

Again, don't clutter up the sticky with questions. Ask question in the regular forum.

A brief history of GUI based Operating Systems migh be in order:
The first Graphical User Interface (GUI)) consisting of graphical elements such as windows, menus, radio buttons, check boxes and icons was developed by Xerox. Xerox created an integrated Operating System (OS) based in this. It allowed the use of a keyboard and a pointing device.

Apple in the early 1980s improved the GUI based OS, followed by Atari, Microsoft and IBM. Apple's Mac OS X uses a Unix-like OS as a base, and Microsoft's Windows sits on top of the original MS DOS. The first successful MS Windows version was Windows 3.0 (1990). The open source Linux OS (also a Unix-like OS) had people develop GUIs like KDE (1996, QT based) and GNOME (1997).

Here is a general discussion of some Python GUI toolkits: http://en.wikibooks.org/wiki/Python_Programming/GUI_Programming

For a typical installation of PyGame and PyQT for Windows see:
http://www.daniweb.com/software-development/python/threads/355545/1519470#post1519470

Here's an example of a basic window frame in pyQT.

You can get pyQT from here: http://www.riverbankcomputing.co.uk/software/pyqt/download

# Code Example: Display a window in PyQt4
# Python 2.6 with PyQt 4

import sys
from PyQt4 import QtGui

class MainFrame(QtGui.QMainWindow):

    def __init__(self):

        QtGui.QMainWindow.__init__(self)

        self.setWindowTitle("Window title") # title
        self.resize(1024, 768) # size
        self.setMinimumSize(800, 600) # minimum size
        self.move(0, 0) # position window frame at top left
        

if __name__ == "__main__":
    app = QtGui.QApplication(sys.argv)

    frame = MainFrame()
    frame.show()
    
    exit_code = app.exec_()
    sys.exit(exit_code)

This next pyQT example builds on the last and incorporates a simple box layout used with a button and a canvas. It also shows how to hook up a button event.

# Code Example: Display a window with a button, icon and canvas in PyQt4
# Python 2.6 with PyQt 4

# This example build on the last one by adding a button, changing the
# window icon, and adding a canvas where we can draw some shapes.

import sys
from PyQt4 import QtGui, QtCore

class MainFrame(QtGui.QMainWindow):

    def __init__(self):

        QtGui.QMainWindow.__init__(self)

        self.setWindowTitle("Window title") # title
        self.resize(1024, 768) # size
        self.setMinimumSize(800, 600) # minimum size
        self.move(0, 0) # position window frame at top left

        # Adding the icon:
        self.setWindowIcon(QtGui.QIcon("myicon.png"))

        # Set the central widget for the main window
        cwidget = QtGui.QWidget(self)

        # Set up a layout for the button and canvas:
        layout = QtGui.QVBoxLayout() #vertical box layout
        #layout = QtGui.QHBoxLayout() #horizontal box layout

        self.add_button(layout)
        self.add_canvas(layout)
        cwidget.setLayout(layout)
        self.setCentralWidget(cwidget)

        # Now set up the shapes that we draw on each button click
        # get the button back from the layout
        button = layout.itemAt(0).widget()
    
        # Create objects used for drawing
        sol_pen =  QtGui.QPen(QtGui.QColor("black"))
        
        dot_pen =  QtGui.QPen(QtGui.QColor("black"))
        dot_pen.setStyle(QtCore.Qt.DotLine)

        dash_pen = QtGui.QPen(QtGui.QColor("black"))
        dash_pen.setStyle(QtCore.Qt.DashLine)
        
        r_brush = QtGui.QBrush(QtGui.QColor("red"))
        g_brush = QtGui.QBrush(QtGui.QColor("green"))
        b_brush = QtGui.QBrush(QtGui.QColor("blue"))

        triangle = QtGui.QPolygonF()
        triangle.append(QtCore.QPointF(100, 50))
        triangle.append(QtCore.QPointF(200, 200))
        triangle.append(QtCore.QPointF(0, 200))


        self.scene_data = []
        # add data for drawing circle
        #self.scene.addEllipse(0, 0, 150, 150, sol_pen, r_brush) #x, y, w, h etc
        self.scene_data.append({'routine':self.scene.addEllipse,
                                'args':(0,0,150,150,sol_pen,r_brush),
                                'z': 0, #z-index
                                'next': "Draw Rectangle"})

        # add data for drawing square
        #self.scene.addRect(100, 100, 150, 150, dot_pen, g_brush) #x, y, w, h etc
        self.scene_data.append({'routine':self.scene.addRect,
                                'args':(100,100,150,150, dot_pen, g_brush),
                                'z':1,
                                'next': "Draw Triangle."})

        # add data for drawing triangle
        #self.scene.addPolygon(triangle, dash_pen, b_brush)
        self.scene_data.append({'routine':self.scene.addPolygon,
                                'z':2,
                                'args':(triangle, dash_pen, b_brush)})

        # Set up self.draw_next_item to fire when button is clicked.
        self.connect(button, QtCore.SIGNAL("clicked()"), self.draw_next_item)
        

    def add_button(self, layout):
        """Create a button and then add it to the layout."""
        button = QtGui.QPushButton("Draw Circle")
        layout.addWidget(button)

    def add_canvas(self, layout):
        """Create a canvas and then add it to the layout."""
        canvas = QtGui.QGraphicsView()
        layout.addWidget(canvas)

        # Now create a graphics scene to draw shapes to.
        # Now remember to keep a reference to GraphicsScene for as long as
        # you're using it, because unlike widgets, these are automatically
        # destroyed when they lose reference count
        self.scene = QtGui.QGraphicsScene()
        canvas.setScene(self.scene)

    def draw_next_item(self):
        # get the button. could've just saved as self.button, but I wanted to
        # show how it could be done this way
        button = self.centralWidget().layout().itemAt(0).widget()

        d = self.scene_data.pop(0) # get first item
        item = d['routine'](*d['args']) # just a little python magic
        item.setZValue(d['z'])

        if len(self.scene_data):
            # more stuff to draw, set button label
            button.setText(d['next'])
        else:
            # no more left, disable button
            button.setText("No more shapes!")
            button.setDisabled(True)


if __name__ == "__main__":
    app = QtGui.QApplication(sys.argv)

    frame = MainFrame()
    frame.show()
    
    exit_code = app.exec_()
    sys.exit(exit_code)

I want write a program with GUI but I don't know which one is better gtk- wx-qt and etc. please guide me.please compair them.
thank.

Here is a comparison of some common Python GUI toolkits. These were created on my Ubuntu/Linux machine, because I could never get PyGTK to go on my Windows Vista machine. I followed the installation routine carefully, but there was always a dll missing, or an entry point wasn't found, or a version missmatch, so I gave up. GTK and PyGTK are more natural on Linux.

Let's take a look at typical PyGTK code:

#!/usr/bin/env python

# display an image using PyGTK + GTK

import pygtk
pygtk.require('2.0')
import gtk

class ShowImage(object):

    def __init__(self):
        # create the main window, and
        window = gtk.Window(gtk.WINDOW_TOPLEVEL)
        # attach destroy signal to terminate the application
        window.connect("destroy", lambda w: gtk.main_quit())
        window.set_border_width(10)
        window.show()

        # a horizontal box to hold the buttons
        hbox = gtk.HBox()
        hbox.show()
        window.add(hbox)
        
        # pick an image file you have in the working directory, or give
        # the full path, can be a .jpg, .png, ,gif, .bmp image file
        # (filenames are case sensitive on Ubuntu/Linux)
        image_file = "LAKE2.gif"
        image = gtk.Image()
        image.set_from_file(image_file)
        image.show()
        # create a button to contain the image widget
        # auto adjusts to image size
        button = gtk.Button()
        button.add(image)
        button.show()
        hbox.pack_start(button)


ShowImage()
gtk.main()

The same test program using PyQT, PyQT installs easily on Windows and Linux machines:

#!/usr/bin/env python

# display an image using PyQT

import sys
from PyQt4 import QtGui

class MyImage(QtGui.QWidget):
    def __init__(self, parent, width, height):
        QtGui.QWidget.__init__(self, parent)

        # pick an image file you have in the working directory, or give
        # the full path, can be a .jpg, .png, ,gif, .bmp image file
        # (filenames are case sensitive on Ubuntu/Linux)
        image_file = "LAKE2.gif"
        image = QtGui.QPixmap(image_file)
        # show the image name in the title
        self.setWindowTitle(image_file)

        # use a label to display the image in
        label = QtGui.QLabel(self)
        label.setGeometry(10, 10, width, height)
        label.setPixmap(image)


app = QtGui.QApplication(sys.argv)
# assume image is about 400x300 pixels in size
width = 400
height = 300
w = MyImage(None, width, height)
# setGeometry(x, y, width, height) ULC coordinates x.y
w.setGeometry(100, 100, width+20, height+20)
w.show()
app.exec_()

Here is a simplified wxPython program (could have used a class):

#!/usr/bin/env python

# display an image using wxPython

import wx

app = wx.App(0)
frame = wx.Frame(None, wx.ID_ANY, "Show an image file")

# pick an image file you have in the working directory, or give
# the full path, can be a .jpg, .png, ,gif, .bmp image file
# (filenames are case sensitive on Ubuntu/Linux)
image_file = 'LAKE2.gif'
image = wx.Bitmap(image_file)
image_width = image.GetWidth()
image_height = image.GetHeight()
# set frame size to image size
frame.SetClientSize((image_width, image_height))
# show the image as static bitmap
wx.StaticBitmap(frame, wx.ID_ANY, image)
# show the image name in the title
frame.SetTitle(image_file)

frame.Show()
app.MainLoop()

Last not least Tkinter, which usually ships with Python:

#!/usr/bin/env python

# display an image using Tkinter

import Tkinter as tk

root = tk.Tk()

# pick an image file you have in your working directory
# or use full path, Tkinter only reads .gif image files
# (filenames are case sensitive on Ubuntu/Linux)
image_file = "LAKE2.gif"
photo = tk.PhotoImage(file=image_file)
root.title(image_file)

# put the image on a typical widget
label = tk.Label(root,image=photo)
label.pack(padx=5, pady=5)

root.mainloop()

Editor's note:
The first line in snee's code
#!/usr/bin/env python
tells Linux where it can find the Python interpreter
it is simply ignored on Windows machines.

commented: Good post +17
commented: keep going +11

Thanks for the sample code and the nice picture. I thought I should add pyglet, which is an audio-visual module using GL and FFmpeg available for Windows and Unix systems ...

# show an image using pyglet
# download pyglet from: http://www.pyglet.org/download.html
# (the event handler is attached via a function decorator)

import pyglet

# pick an image file you have in the working directory, or give
# the full path, can be a .jpg, .png, ,gif, .bmp image file
# (I understand filenames are case sensitive on Linux)
image_file = 'LAKE2.gif'
img = pyglet.image.load(image_file)

# create and size the window to the picture size + 
# a small frame around it
w = img.width + 10
h = img.height + 10
win = pyglet.window.Window(width=w, height=h)

# give the window a title
win.set_caption(image_file)

@win.event
def on_draw():
    win.clear()
    # draw image in window at coordinates x=5, y=5
    # note that coordinates start at lower left corner 
    img.blit(5, 5)

pyglet.app.run()

Pyglet is not a full GUI toolkit, but has its strength in audio and video presentations.

PyQT was no problem on Windows XP. I downloaded and installed:
http://www.riverbankcomputing.com/static/Downloads/PyQt4/PyQt-Py2.5-gpl-4.4.3-1.exe

The cumbersome split between QtCore and QtGui is made simpler if you use the import statements show below ...

# a simple window using PyQT 
# with 2 buttons and a label

import sys
# might be easier to use this import option
from PyQt4.QtCore import *
from PyQt4.QtGui import *

class MyForm(QWidget):
    def __init__(self):
        QWidget.__init__(self)
        # setGeometry(x_pos, y_pos, width, height)
        self.setGeometry(100, 150, 320, 100)
        self.setWindowTitle("A simple window")

        # use a grid layout for the widgets
        grid = QGridLayout()

        btn_hello = QPushButton("Hello")
        # bind the button click to a function reference
        self.connect(btn_hello, SIGNAL("clicked()"), self.on_click)
        
        btn_quit = QPushButton("Quit")
        self.connect(btn_quit, SIGNAL("clicked()"), app.quit)
        
        self.label = QLabel("-------------")

        # addWidget(widget, row, column, rowSpan=1, columnSpan=1)
        grid.addWidget(btn_hello, 0, 0)
        # this will span the label over 3 columns
        grid.addWidget(self.label, 1, 0, 1, 3)
        grid.addWidget(btn_quit, 2, 0)

        self.setLayout(grid)
    
    def on_click(self):
        self.label.setText("You clicked the Hello button!")


app =  QApplication(sys.argv)
form = MyForm()
form.show()
app.exec_()

This little PyQT template can be used for quite a few basic programs. Now, if I could introduce some color! Hey, I am a slow learner!

One of my standard test programs for any GUI toolkit, creating, loading a listbox and selecting an item. Here is the PyQT code ...

# a simple window using PyQT 
# with a button and a listbox to load and select

import sys
# might be easier to use this import option
from PyQt4.QtCore import *
from PyQt4.QtGui import *

class MyForm(QWidget):
    def __init__(self, name_list):
        QWidget.__init__(self)
        # setGeometry(x_pos, y_pos, width, height)
        self.setGeometry(100, 150, 300, 220)
        self.setWindowTitle("Load the listbox first")
        
        # make name_list available for methods
        self.name_list = name_list

        # use a grid layout for the widgets
        grid = QGridLayout()

        btn_load = QPushButton("Load List")
        # bind the button click to a function reference
        self.connect(btn_load, SIGNAL("clicked()"), self.on_click)
        
        self.listbox = QListWidget()
        self.connect(self.listbox, SIGNAL("itemSelectionChanged()"), self.on_select)
        
        # addWidget(widget, row, column, rowSpan, columnSpan)
        grid.addWidget(btn_load, 0, 0, 1, 1)
        # listbox spans over 5 rows and 2 columns
        grid.addWidget(self.listbox, 1, 0, 5, 2)
        self.setLayout(grid)
    
    def on_click(self):
        """the load button has been clicked, load the listbox"""
        self.listbox.addItems(self.name_list)
    
    def on_select(self):
        """an item in the listbox has been clicked/selected"""
        selected_name =  self.listbox.selectedItems()[0].text()
        self.setWindowTitle(selected_name)
        

name_list = [
"Erich Meitinger",
"Udo Baus",
"Jens Klein",
"Bjorn Bork",
"Heidrun Lovelace",
"Klaus Abraham",
"Ulla Jorgens",
"Volger Jenkings",
"Helmut Schmidt",
"Freja Larse",
"Larry Orkan",
"Andreas Mauser",
"Harry Heimlich"
]

app =  QApplication(sys.argv)
form = MyForm(name_list)
form.show()
app.exec_()

I do miss the colors. Here is the corresponding wxPython code with some colors added ...

# a simple window using wxPython 
# with a button and a listbox to load and select

import wx

class MyFrame(wx.Frame):
    def __init__(self, name_list):
        wx.Frame.__init__(self, parent=None)
        self.SetBackgroundColour("green")  # ah, color!
        self.SetTitle('Load the listbox first')
        
        # make name_list available for methods
        self.name_list = name_list        

        # use a grid layout for the widgets
        grid = wx.GridBagSizer()
        
        self.btn_load = wx.Button(self, -1, "Load List")
        # bind the button click to a function reference
        self.btn_load.Bind(wx.EVT_BUTTON, self.on_click)
        
        self.listbox = wx.ListBox(self)
        self.listbox.SetBackgroundColour("yellow")
        self.listbox.Bind(wx.EVT_LISTBOX, self.on_select)
        
        # Add(widget, pos=(row, column), span=(rowspan, columnspan))
        grid.Add(self.btn_load, pos=(0, 0), flag=wx.ALL, border=5)
        # add a 180 pixel wide spacer
        grid.Add((180, 0), pos=(0, 1))
        grid.Add(self.listbox, pos=(1,0), span=(10,2),
            flag=wx.ALL|wx.EXPAND, border=5)
        self.SetSizerAndFit(grid)
        
    def on_click(self, event):
        """the load button has been clicked, load the listbox"""
        self.listbox.Set(self.name_list)        
        
    def on_select(self, event):
        """an item in the listbox has been clicked/selected"""
        selected_name = self.listbox.GetStringSelection()
        self.SetTitle(selected_name)        


name_list = [
"Erich Meitinger",
"Udo Baus",
"Jens Klein",
"Bjorn Bork",
"Heidrun Lovelace",
"Klaus Abraham",
"Ulla Jorgens",
"Volger Jenkings",
"Helmut Schmidt",
"Freja Larse",
"Larry Orkan",
"Andreas Mauser",
"Harry Heimlich"
]

app = wx.App(0)
MyFrame(name_list).Show()
app.MainLoop()

The wx.GridBagSizer() seems to be more complex.

I got PyQT4 istalled and working on my Vista computer. Here is an example of my first program:

# display a bunch of random circles using PyQT4

import random
import sys
# pray for minimal namespace conflicts
from PyQt4.QtCore import *
from PyQt4.QtGui import *

class DrawPoints(QWidget):
    def __init__(self, parent=None):
        QWidget.__init__(self, parent)
        # setGeometry(x_pos, y_pos, width, height)
        self.setGeometry(200, 200, 400, 400)
        self.setWindowTitle('Draw random Circles')

    def paintEvent(self, event):
        painter = QPainter()
        painter.begin(self)
        # pen sets the edge color of the circles
        painter.setPen(Qt.black)
        w = self.size().width()
        h = self.size().height()
        # draw 150 circles of random sizes, locations and colors
        for i in range(150):
            # color uses red, green, blue values (0 to 255)
            r = random.randint(0, 255)
            g = random.randint(0, 255)
            b = random.randint(0, 255)
            # brush sets the fill color of the circles
            painter.setBrush(QBrush(QColor(r, g, b)))
            # get center coordinates x,y of the circle
            x = random.randint(1, w-1)
            y = random.randint(1, h-1)
            # get the radius of the circle
            radius = random.randint(5, 80)
            # to draw circles match the radius
            painter.drawEllipse(QPoint(x, y), radius, radius)

        painter.end()


app = QApplication(sys.argv)
dp = DrawPoints()
dp.show()
app.exec_()

An example how to use the QPainter to create a wallpaper background:

# a simple window using PyQT 
# using a canvas with a texture/wallpaper background

import sys
# pray for minimal namespace conflicts
from PyQt4.QtCore import *
from PyQt4.QtGui import *

class MyForm(QWidget):
    def __init__(self):
        QWidget.__init__(self)
        # setGeometry(x_pos, y_pos, width, height)
        self.setGeometry(100, 150, 350, 300)
        self.setWindowTitle("Creating a Canvas Wallpaper")
        
    def paintEvent(self, event):
        """create a painting canvas"""
        painter = QPainter()
        painter.begin(self)
        painter.setRenderHint(QPainter.Antialiasing)
        # use the brush for a texture/wallpaper background
        # supply a background image file you have (add needed path)
        painter.setBrush(QBrush(QPixmap("BG_GoldSwirl.gif")))
        painter.drawRect(event.rect())
        
        # optionally write something in the wallpaper
        # (check the fonts available on your computer)
        painter.setFont(QFont('Freestyle Script', 48))
        painter.drawText(50, 160, "Hello World!")
        
        painter.end()


app =  QApplication(sys.argv)
form = MyForm()
form.show()
app.exec_()

A small Python/PyQT4 utility program to find out what kind of fonts your computer has:

# bring up a font dialog with PyQT4
# show the selected font using a sample text

import sys
# hopefully no namespace conflicts
from PyQt4.QtCore import *
from PyQt4.QtGui import *

class FontDialog(QWidget):
    def __init__(self, parent=None):
        QWidget.__init__(self, parent)
        self.setGeometry(10, 100, 250, 110)
        self.setWindowTitle('QFontDialog')

        hbox = QVBoxLayout()

        button = QPushButton('Font Dialog')
        self.connect(button, SIGNAL('clicked()'), self.showDialog)
        
        # the label autosizes to the text
        text = "The quick brown fox jumps over the lazy dog"
        self.label = QLabel(text)
        self.label.move(130, 20)
        
        self.edit = QTextEdit()

        hbox.addWidget(button)
        hbox.addWidget(self.label)
        hbox.addWidget(self.edit)
        self.setLayout(hbox)

    def showDialog(self):
        font, ok = QFontDialog.getFont()
        if ok:
            # display the label's text in the selected font
            self.label.setFont(font)
        # display the font name in the edit box for copying
        self.edit.append(QFontInfo(font).family())


app = QApplication(sys.argv)
fd = FontDialog()
fd.show()
app.exec_()

Save the code as pqt_FontLister.pyw

Tkinter has the reputation to look kind of homely on Windows computers. Actually, on my Ubuntu/Linux computer it doesn't look bad at all. Here is a typical listbox example using the Tkinter GUI toolkit that comes with just about every Python installation. Yes, if you use the new Python3, it comes with Tkinter too. Just remember that Tkinter is now a package and you have to import tkinter rather than Tkinter:

#!/usr/bin/env python

# create a scrollable listbox using Tkinter
# load the listbox with tasty cheese data
# and select your favorite cheese with the mouse
# with Python3 use   import tkinter as tk

import Tkinter as tk

def get_list(event):
    """
    function to read the listbox selection
    and put the result in a label widget
    """
    # get selected line index
    index = listbox.curselection()[0]
    # get the line's text
    seltext = listbox.get(index)
    # put the selected text in the label
    label['text'] = seltext

root = tk.Tk()
root.title("Cheeses")
# use width x height + x_offset + y_offset (no spaces!)
root.geometry("180x300+30+50")

# create a label (width in characters)
s = "Click on a cheese"
label = tk.Label(root, text= s, width=15)
label.grid(row=0, column=0)

# create a listbox (height in characters/lines)
# give it a nice yellow background (bg) color
listbox = tk.Listbox(root, height=15, bg='yellow')
listbox.grid(row=1, column=0)

# the Tkinter listbox does not automatically scroll, you need
# to create a vertical scrollbar to the right of the listbox
yscroll = tk.Scrollbar(command=listbox.yview, orient=tk.VERTICAL)
yscroll.grid(row=1, column=1, sticky='n'+'s')
listbox.configure(yscrollcommand=yscroll.set)

cheese_list = [
'Feta', 'Limburger', 'Camembert', 'Roquefort', 'Edam',
'Romadur', 'Liptauer', 'Dubliner', 'Gouda', 'Gorgonzola',
'Jarlsberg', 'Golka', 'Garrotxa', 'Swiss', 'Quesillo',
'Emmentaler', 'Appenzeller', 'Raclette', 'Asiago', 'Zuvi',
'Ricotta', 'Mozzarella', 'Munster', 'Parmesan']

# load the listbox
for item in cheese_list:
    listbox.insert('end', item)
    
# use left mouse click on a list item to display selection
listbox.bind('<ButtonRelease-1>', get_list)

root.mainloop()

Again, the first line in my code is for Linux to find the Python interpreter. I really like the Firefox web browser and its built in automatic spell checker.

The nice thing about using a GUI toolkit is that you have a large number of widgets available to supply the data input. Here is a Tkinter Temperature Converter example using radio buttons to select the type of conversion and a scale (slider) to set the temperature. Notice that the result is updated as changes to the inputs are made:

#!/usr/bin/env python

# use Tkinter's scale/slider and radiobutton widgets
# for input data to convert temperature values

import Tkinter as tk

def on_click():
    """radio button clicked, change results too"""
    on_move()

def on_move(value=0):
    """use slider position to calculate and display result"""
    # radio button1 is set convert C to F
    if rb_v.get() == id_rb1:
        c = scale.get()
        f = c*9/5.0 + 32
        result = "%s celsius --> %s Fahrenheit" % (c, f)
    # radio button2 is set convert F to C
    else:
        f = scale.get()
        c = (f - 32)*5/9.0
        result = "%s Fahrenheit --> %s Celsius" % (f, c)
    label['text'] = result

root = tk.Tk()
root.title('Temperature Converter')
# use width x height + x_offset + y_offset (no spaces!)
root.geometry("620x110+30+50")

# used by the radio button_id
rb_v  = tk.IntVar()

# the radio buttons allow selection of Celsius or Fahrenheit
id_rb1 = 101
rb1 = tk.Radiobutton(root, text='Celsius to Fahrenheit',
    value=id_rb1, variable=rb_v, command=on_click)
id_rb2 = 102
rb2 = tk.Radiobutton(root, text='Fahrenheit to Celsius',
    value=id_rb2, variable=rb_v, command=on_click)
# start with rb1 selected
rb_v.set(id_rb1)

# the scale (or slider) selects the temperature
# from -50 to +300
# (from_ is used because from is a reserved word in Python)
scale = tk.Scale(root, label="select temperature",
    from_=-50, to=300, tickinterval=0, resolution=1, length=600,
    showvalue='yes', orient='horizontal', command=on_move)
# set the starting position of the scale
scale.set(50)

# show the result in a label
label = tk.Label(root, text='---', bg='yellow')

# place the widgets in a grid
rb1.grid(row=0, column=0)
rb2.grid(row=0, column=1)
scale.grid(row=1, columnspan=2)
label.grid(row=2, columnspan=2, pady=5)

root.mainloop()

Once more, the first line in my code is for Linux to find the Python interpreter. If you have Windows, Windows will ignore this line or you can. Also, if you use the newer Python3 version, use import tkinter as tk.

Tkinter has some nice pop-up dialogs that can also be used for regular console programs. Here is an example to use if you want to get a filename from a pop-up window. It works with Python2x or Python3x, just read the comments:

# use Tkinter's file dialog window to get
# a file name with full path, you can also use
# this to get filenames for a console program
# askopenfilename() gives one selected filename

# with Python25 use ...
#import Tkinter as tk
#from tkFileDialog import askopenfilename

# with Python30 use ...
import tkinter as tk
from tkinter.filedialog import askopenfilename

root = tk.Tk()
# show askopenfilename dialog without the Tkinter window
root.withdraw()

# default is all file types
file_name = askopenfilename()

print(file_name)

This code sample shows you how to select and display multiple lines from a Tkinter Listbox ...

# a simple Tkinter Listbox example
# press the shift or ctrl key to select multiple items
# source: snee

import Tkinter as tk

def get_list():
    """
    function to read the listbox selection(s)
    (mutliple lines can be selected)
    and put the result(s) in a label
    """
    # tuple of line index(es)
    sel = listbox.curselection()
    # get the text, might be multi-line
    seltext = '\n'.join([listbox.get(x) for x in sel])
    label_text.set(seltext)

root = tk.Tk()
# used for label text
label_text = tk.StringVar(root)

# extended mode allows CTRL/SHIFT mouse selections
listbox = tk.Listbox(root, selectmode=tk.EXTENDED)
listbox.pack()

# click the button to show the selection(s)
button = tk.Button(root, text="Get Selection(s)", command=get_list)
button.pack()

# used to display selection(s)
label = tk.Label(root, textvariable=label_text)
label.pack()

# load some datalines into the listbox
items = ["one", "two", "three", "four", "five", "six"]
for item in items:
    listbox.insert(tk.END, item)

# highlight/preselect line 3 of listbox (starts with zero)
# lb.selection_set(first, last=None) can preselect more than 1 line
listbox.selection_set(3)

root.mainloop()

Left mouse click with and without pressing the SHIFT or CTRL key to see how the multiple selection works.

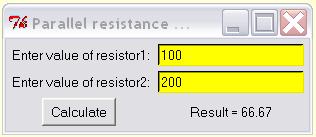
I modernized an old snippet of mine ...

# Tkinter GUI program with 2 data entry, labels and a button
# a general template to input 2 numbers and calculate something
# here the resistance of 2 resistors in parallel
# for Python3 use: import tkinter as tk
# vegaseat

import Tkinter as tk

def calculate():
    """ calculate the resistance of 2 resistors in parallel """
    try:
        r1 = float(enter1.get())
        r2 = float(enter2.get())
        if r1 + r2 > 0:
            rp = (r1 * r2) / (r1 + r2)
            result = "Result = %0.2f" % rp
            label3.config(text=result)
        else:
            label3.config(text='Division by zero error')
    except ValueError:
        label3.config(text='Need numeric values')

def setfocus2(event):
    enter2.focus_set()

        
# create root window
root = tk.Tk()
root.title("Parallel resistance ...")

# create all the components
label1 = tk.Label(root, text=' Enter value of resistor1:')
enter1 = tk.Entry(root, bg='yellow')
label2 = tk.Label(root, text=' Enter value of resistor2:')
enter2 = tk.Entry(root, bg='yellow')
btn1 = tk.Button(root, text=' Calculate ', command=calculate)
label3 = tk.Label(root, text='')

# use a grid for component layout
label1.grid(row=0, column=0)
enter1.grid(row=0, column=1, padx=5, pady=5)
label2.grid(row=1, column=0)
enter2.grid(row=1, column=1)
btn1.grid(row=2, column=0, pady=5)
label3.grid(row=2, column=1)

# start cursor in enter1
enter1.focus_set()

# return key in enter1 sets focus to enter2
enter1.bind("<Return>", func=setfocus2)

# start event loop and program
root.mainloop()

Those little animated gif image files are fun. Here is an example of using PyQt's QMovie() widget to play them ...

# use PyQt's QMovie() widget to play an animated gif
# tested with PyQt4.4 and Python 2.5
# also tetsed with PyQt4.5 and Python 3.0
# vegaseat

import sys 
# expect minimal namespace conflicts
from PyQt4.QtCore import *
from PyQt4.QtGui import * 

class MoviePlayer(QWidget): 
    def __init__(self, parent=None): 
        QWidget.__init__(self, parent) 
        # setGeometry(x_pos, y_pos, width, height)
        self.setGeometry(200, 200, 400, 300)
        self.setWindowTitle("QMovie to show animated gif")

        # set up the movie screen on a label
        self.movie_screen = QLabel()
        # expand and center the label 
        self.movie_screen.setSizePolicy(QSizePolicy.Expanding, 
            QSizePolicy.Expanding)        
        self.movie_screen.setAlignment(Qt.AlignCenter) 

        main_layout = QVBoxLayout() 
        main_layout.addWidget(self.movie_screen) 
        self.setLayout(main_layout) 

        # use an animated gif file you have in the working folder
        # or give the full file path                
        movie = QMovie("AG_Dog.gif", QByteArray(), self) 
        movie.setCacheMode(QMovie.CacheAll) 
        movie.setSpeed(100) 
        self.movie_screen.setMovie(movie) 
        movie.start() 
        

app = QApplication(sys.argv) 
player = MoviePlayer() 
player.show() 
sys.exit(app.exec_())

Draw a simple bar chart with PyQT:

# use PyQT to draw a simple vertical bar chart
# tested with PyQT4.5 and Python3.0
# ene

import sys
# simplified import, hopefully no namespace conflicts
from PyQt4.QtCore import *
from PyQt4.QtGui import *

class BarChart(QWidget):
    def __init__(self, data, parent=None):
        QWidget.__init__(self, parent)
        # setGeometry(x_pos, y_pos, width, height)
        self.setGeometry(300, 300, 360, 320)
        self.setWindowTitle('A Simple Bar Chart')
        self.data = data

    def paintEvent(self, event):
        painter = QPainter()
        painter.begin(self)
        
        # set color and width of line drawing pen
        painter.setPen(QPen(Qt.black, 2))
        
        # drawLine(x1, y1, x2, y2) from point (x1,y1) to (x2,y2)
        # draw the baseline
        painter.drawLine(20, 280, 340, 280)        

        # set up color and width of the bars
        width = 20
        painter.setPen(QPen(Qt.red, width))
        delta = width + 5
        x = 30
        for y in self.data:
            # correct for width
            y1 = 280 - width/2
            y2 = y1 - y + width/2
            # draw each bar
            painter.drawLine(x, y1, x, y2)
            # add values to the top of each bar
            s = str(y)
            painter.drawText(x-8, y2-15, s)
            x += delta        

        painter.end()


# data to be graphed
data = [30, 45, 80, 150, 220, 180, 110, 75, 50, 35, 20, 10]
app = QApplication(sys.argv)
bc = BarChart(data)
bc.show()
app.exec_()

PyQT has an interesting widget called a dial (circular slider). Here is a simple applcation:

# use a PyQT QDial knob to select a temperature
# show Celsius and corresponding Fahrenheit values
# as the knob is rotated
# tested with PyQT4.5 and Python3.0
# ene

import sys
# has minimal namespace conflicts
from PyQt4.QtCore import *
from PyQt4.QtGui import *

class MyFrame(QWidget):
    def __init__(self, parent=None):
        QWidget.__init__(self, parent)
        # setGeometry(x_pos, y_pos, width, height)
        self.setGeometry(150, 150, 328, 440)
        self.setWindowTitle('Convert Temperature')
        
        self.dial = QDial(self)
        self.dial.setGeometry(QRect(10, 20, 311, 351))
        self.dial.setMinimum(-50)
        self.dial.setMaximum(310)
        self.dial.setPageStep(10)
        # initial dial pointer position
        dial_pos = 50
        self.dial.setSliderPosition(dial_pos)
        self.dial.setWrapping(True)
        self.dial.setNotchTarget(3.6)
        self.dial.setNotchesVisible(True)

        self.label_c = QLabel(self)
        self.label_c.setGeometry(QRect(30, 390, 121, 31))
        font = QFont()
        font.setPointSize(11)
        self.label_c.setFont(font)
        self.label_c.setAlignment(Qt.AlignCenter)

        self.label_f = QLabel(self)
        self.label_f.setGeometry(QRect(170, 390, 131, 31))
        font = QFont()
        font.setPointSize(11)
        self.label_f.setFont(font)
        self.label_f.setAlignment(Qt.AlignCenter)
        
        # start up
        self.show_temps()
        # update show_temps()
        self.connect(self.dial, SIGNAL("sliderMoved(int)"),
            self.show_temps)

    def show_temps(self):
        """
        get the C value from the dial label
        calculate F value and show
        """ 
        c = float(self.dial.value())
        s_c = "%0.1f Celsius" % c
        self.label_c.setText(s_c)
        f = c*9/5.0 + 32
        s_f = "%0.1f Fahrenheit" % f
        self.label_f.setText(s_f)
        

app = QApplication(sys.argv)
frame = MyFrame()
frame.show()
sys.exit(app.exec_())

Sorry, I am having real problems with my HP notebook, the keyboard is of very poor quality and misses keystrokes a lot!

An example how to use an image as a background. In order to make added text transparent, use the Tkinter canvas:

# use a Tkinter canvas for a background image
# add transparent text and other widgets
# with Python3 use   import tkinter as tk
# snee

import Tkinter as tk
 
root = tk.Tk()
root.title('background image')

# pick a .gif image file you have in the working directory
bg_image = tk.PhotoImage(file="Flowers.gif")
w = bg_image.width()
h = bg_image.height()
 
# size the window so the image will fill it
root.geometry("%dx%d+0+0" % (w, h))

cv = tk.Canvas(width=w, height=h)
cv.pack(side='top', fill='both', expand='yes')
cv.create_image(0, 0, image=bg_image, anchor='nw')
 
# add canvas text at coordinates x=15, y=30
# anchor='nw' implies upper left corner coordinates
cv.create_text(15, 30, text="Python Greetings", fill="red", anchor='nw')

# now some button widgets
btn1 = tk.Button(cv, text="Click")
btn1.pack(side='left', padx=10, pady=5, anchor='sw')

btn2 = tk.Button(cv, text="Quit")
btn2.pack(side='left', padx=10, pady=5, anchor='sw')

root.mainloop()

PyGame is a GUI based module used mostly for game programming with Python. It comes with colorful graphics, sprites for animation, sound and responds to the mouse and keyboard ...

# a simple pygame example
# module pygame free from: http://www.pygame.org
# creates nested circles on a yellow background
# vegaseat

import pygame

pygame.init()

# create a 300 x 300 pixel display window
# the default background is black
win = pygame.display.set_mode((300, 300))
# add nice title
pygame.display.set_caption("Bull's Eye!")

# pygame uses (r, g, b) color tuples
white = (255, 255, 255)
black = (0, 0, 0)
red = (255, 0, 0)
yellow = (255, 255, 0)

# create a canvas (in memory) to draw on
canvas = pygame.Surface(win.get_size())
# fill surface
canvas.fill(yellow)

center = (150, 150)
# draw a black border circle
radius = 92
pygame.draw.circle(canvas, black, center, radius)

# draw a white circle
radius = 90
pygame.draw.circle(canvas, white, center, radius)

# draw a red circle that fits into the white one
radius = 80
pygame.draw.circle(canvas, red, center, radius)

# finally the black bull's eye
radius = 10
pygame.draw.circle(canvas, black, center, radius)

# transfer canvas to display window at ulc (x=0, y=0)
win.blit(canvas, (0, 0))

# update/flip to show on the computer display
pygame.display.flip()

# event loop and exit conditions (windows titlebar x click)
while True:
    for event in pygame.event.get():
        if event.type == pygame.QUIT:
            raise SystemExit

Here is a general notebook widget class for Tkinter:

# testing a notebook widget class for Tkinter (modified)
# Python 2.5.4 ene

import Tkinter as tk

class Notebook(object):
    """
    a notebook widget class for Tkinter applications
    """
    def __init__(self, parent):
        self.active_page = None
        self.count = 0
        self.selected = tk.IntVar(0)
        # orientation of initial tab (can go 'bottom' too)
        side = 'top'
        # new tabs go
        self.side= 'left'
        # create notebook's initial page frame
        self.tab = tk.Frame(parent)
        self.tab.pack(side=side, fill='both')
        self.page = tk.Frame(parent)
        self.page.pack(fill='both')

    def __call__(self):
        """
        parent page reference
        """
        return self.page

    def add_page(self, pg, title):
        """
        add a new page to the notebook
        """
        rb = tk.Radiobutton(self.tab, text=title, indicatoron=0, variable=self.selected,
            value=self.count, command=lambda: self.display_page(pg))
        rb.pack(fill='both', side=self.side)
        # first page is slected by default
        if not self.active_page:
            pg.pack(fill='both', expand=True)
            self.active_page = pg
        self.count += 1
        # returns reference
        return rb

    def display_page(self, pg):
        """
        shows selected page, hides former page
        """
        self.active_page.forget()
        pg.pack(fill='both', expand=True)
        self.active_page = pg


# testing the module
if __name__ == '__main__':
    root = tk.Tk()
    # use width x height + x_offset + y_offset (no spaces!)
    root.geometry("400x200+100+50")
    root.title('Testing a Tkinter notebook widget')

    nb = Notebook(root)

    # create first page (notice the instance call)
    page1 = tk.Frame(nb())
    nb.add_page(page1, 'page 1')
    # put something on the page
    # text entry field, width=width in chars, height=lines text
    text1 = tk.Text(page1, width=60, height=12, bg='yellow')
    text1.pack(fill='both')
    text1.insert(tk.INSERT, ' this is page number 1')

    # create second page, also has a button
    page2 = tk.Frame(nb())
    nb.add_page(page2, 'page 2')
    # put something on the page
    text2 = tk.Text(page2, width=60, height=12, bg='green')
    text2.pack(fill='both')
    s1 = ' this is page number 2 \n'
    s2 = ' Look, I am green! \n'
    s3 = ' Also, I have a button to click!'
    text2.insert(tk.INSERT, s1+s2+s3)
    # just a dummy button
    button2 = tk.Button(page2, text=' save text to file ')
    button2.pack(side='left')
    
    root.mainloop()

I just recently wanted to dabble in GUI programming so I took one of my older programs and added a GUI to it.

By the way: I'm using python 3.1 and the tkinter that comes with it... they changed the module name from Tkinter to tkinter in 3.1...

import random
import tkinter as tk
                     
def Coin_Toss():
    try:
        n = float(enter.get())
        if n > 0:
            label2.config(text='')
    except ValueError:
        label2.config(text='Need numeric value')
    
    display = "" 
    
    heads = 0
    tails = 0
    counter = 0
    Heads = "H"
    Tails = "T"

    try:
        while (counter < n):
             if random.randrange(2):	
                 heads += 1
                 if heads > 0:
                      display = str(display + "  " + Heads)
                      label.config(text=display)
                 counter += 1
             else:
                 tails += 1
                 if tails > 0:
                      display = str(display + "  " + Tails)
                      label.config(text=display)
                 counter += 1
        hep = heads * 100 / n
        tap = tails * 100 / n
        h = repr(heads)
        t = repr(tails)
        hp = repr(hep)
        tp = repr(tap)
        display = display + "  "
        label.config(text=display)
        display1 = str("The coin landed on heads " + h + " times.")
        label3.config(text=display1)
        display2 = str("The coin landed on tails " + t + " times.")
        label4.config(text=display2)
        display3 = str("The coin landed on heads " + hp + "% of the time.")
        label5.config(text=display3)
        display4 = str("The coin landed on tails " + tp + "% of the time.")
        label6.config(text=display4)
        btn.config(text=' End ', command=End)
    except UnboundLocalError:
        pass

def End():
    display = "Thank you for running Coin Toss."
    label.config(text=display)
    display = ''
    label.config(text=display)
    n = 0
    label.config(text='')
    label2.config(text='')
    label3.config(text='')
    label4.config(text='')
    label5.config(text='')
    label6.config(text='')
    btn.config(text=' Run ', command=Coin_Toss)
    

root = tk.Tk()
root.title("DevPython Suite")

label = tk.Label(root, text='')
label1 = tk.Label(root, text='Number of times to flip the coin: ')
label2 = tk.Label(root, text='')
label3 = tk.Label(root, text='')
label4 = tk.Label(root, text='')
label5 = tk.Label(root, text='')
label6 = tk.Label(root, text='')
label0 = tk.Label(root, text='Welcome to the Coin Toss Program')
enter = tk.Entry(root)
btn = tk.Button(root, text=' Run ', command=Coin_Toss)

label0.grid(row=0, column=0)
label1.grid(row=1, column=0)
enter.grid(row=2,column=0)
btn.grid(row=3,column=0)
label2.grid(row=4,column=0)
label.grid(row=5,column=0)
label3.grid(row=6,column=0)
label4.grid(row=7,column=0)
label5.grid(row=8,column=0)
label6.grid(row=9,column=0)

enter.focus_set()

root.mainloop()

any tips for a guy just starting to program GUI's?

I made some minor changes to the program above but i don't feel like posting it with so little changes... the jist of what i changed is i changed:

#insert the lines of code in place of the existing code in the lines mentioned

import random, time #line 1
message.config(text=display) #lines 41
label2.config(text=display) #line 56
message.config(text='') #line 60
message = tk.Message(root, text='') #line 72
message.grid(row=5,column=0) #line 88

#delete lines 26, 32, 40, 57, 58, & 61

now it can display up to around 3000

This an example showing the use of ttk that comes with the Python 3.1 installation as part of tkinter ...

'''
Python31 includes the Tkinter Tile extension Ttk.

Ttk comes with 17 widgets, 11 of which already exist in Tkinter: 
Button, Checkbutton, Entry, Frame, Label, LabelFrame, Menubutton, 
PanedWindow, Radiobutton, Scale and Scrollbar 

The 6 new widget classes are: 
Combobox, Notebook, Progressbar, Separator, Sizegrip and Treeview

For additional info see the Python27 or Python31 manual:
http://gpolo.ath.cx:81/pydoc/library/ttk.html

Here the TreeView widget is configured as a multi-column listbox
with adjustable column width and column-header-click sorting.

Tested with Python3.1 and Tkinter8.5  by  vegaseat  17jul2009
modified to work with Python273 and Python31+
'''

try:
    # Python 2.7.3
    import Tkinter as tk
    import tkFont
    import ttk
except ImportError:
    # Python 3.1 or higher
    import tkinter as tk
    import tkinter.font as tkFont
    import tkinter.ttk as ttk

class McListBox(object):
    """use a ttk.TreeView as a multicolumn ListBox"""
    def __init__(self):
        self.tree = None
        self._setup_widgets()
        self._build_tree()

    def _setup_widgets(self):
        s = """\
click on header to sort by that column
to change width of column drag boundary
        """
        msg = ttk.Label(wraplength="4i", justify="left", anchor="n",
            padding=(10, 2, 10, 6), text=s)
        msg.pack(fill='x')

        container = ttk.Frame()
        container.pack(fill='both', expand=True)

        # create a treeview with dual scrollbars
        self.tree = ttk.Treeview(columns=element_header, show="headings")
        vsb = ttk.Scrollbar(orient="vertical", command=self.tree.yview)
        hsb = ttk.Scrollbar(orient="horizontal", command=self.tree.xview)
        self.tree.configure(yscrollcommand=vsb.set, xscrollcommand=hsb.set)
        self.tree.grid(column=0, row=0, sticky='nsew', in_=container)
        vsb.grid(column=1, row=0, sticky='ns', in_=container)
        hsb.grid(column=0, row=1, sticky='ew', in_=container)

        container.grid_columnconfigure(0, weight=1)
        container.grid_rowconfigure(0, weight=1)

    def _build_tree(self):
        for col in element_header:
            self.tree.heading(col, text=col.title(),
                command=lambda c=col: sortby(self.tree, c, 0))
            # adjust the column's width to the header string
            self.tree.column(col, width=tkFont.Font().measure(col.title()))

        for item in element_list:
            self.tree.insert('', 'end', values=item)

            # adjust column's width if necessary to fit each value
            for ix, val in enumerate(item):
                col_w = tkFont.Font().measure(val)
                if self.tree.column(element_header[ix], width=None) < col_w:
                    self.tree.column(element_header[ix], width=col_w)


def isnumeric(s):
    """test if a string is numeric"""
    for c in s:
        if c in "1234567890-.":
            numeric = True
        else:
            return False
    return numeric

def change_numeric(data):
    """if the data to be sorted is numeric change to float"""
    new_data = []
    if isnumeric(data[0][0]):
        # change child to a float
        for child, col in data:
            new_data.append((float(child), col))
        return new_data
    return data

def sortby(tree, col, descending):
    """sort tree contents when a column header is clicked on"""
    # grab values to sort
    data = [(tree.set(child, col), child) for child in tree.get_children('')]
    # if the data to be sorted is numeric change to float
    data =  change_numeric(data)
    # now sort the data in place
    data.sort(reverse=descending)
    for ix, item in enumerate(data):
        tree.move(item[1], '', ix)
    # switch the heading so that it will sort in the opposite direction
    tree.heading(col,
        command=lambda col=col: sortby(tree, col, int(not descending)))


# the test data ...
element_header = ['symbol', 'name', 'atomic weight', 'melt (K)', 'boil (K)']
element_list = [
('H', 'Hydrogen', '1.00794', '13.81', '20.28') ,
('He', 'Helium', '4.00260', '0.95', '4.216') ,
('Li', 'Lithium', '6.941', '453.7', '1615') ,
('Be', 'Beryllium', '9.01218', '1560', '3243') ,
('B', 'Boron', '10.811', '2365', '4275') ,
('C', 'Carbon', '12.011', '3825', '5100') ,
('N', 'Nitrogen', '14.0067', '63.15', '77.344') ,
('O', 'Oxygen', '15.9994', '54.8', '90.188') ,
('F', 'Fluorine', '18.99840', '53.65', '85.0') 
]

root = tk.Tk()
root.wm_title("ttk.TreeView as multicolumn ListBox")
mc_listbox = McListBox()
root.mainloop()

Just bought used Dell XP notebook for class work and installed Python 3.1 and then PyQT4 form:
http://www.riverbankcomputing.co.uk/software/pyqt/download
Windows installer (14JUL2009):
PyQt-Py3.1-gpl-4.5.2-1.exe

I also installed PyScripter IDE from:
http://code.google.com/p/pyscripter/
Windows installer:
PyScripter-v1.9.9.7-Setup.exe

All Python things works charmingly well!

Here is my experiment with the PyQT code:

# simple PyQT window with two buttons and one label
# to test pop-up dialogs for getting name and age
# QInputDialog.getText(parent, title, label, echo=QLineEdit.Normal,
#   text=QString(), flags=0)
# QInputDialog.getInt(parent, title, label, value, minValue,
#   maxValue, step=1, flags=0)
# http://www.riverbankcomputing.com/static/Docs/PyQt4/html/qinputdialog.html

import sys
# use this import option for simplicity
from PyQt4.QtCore import *
from PyQt4.QtGui import *

class MyForm(QWidget):
    def __init__(self):
        QWidget.__init__(self)
        # setGeometry(x_pos, y_pos, width, height)
        self.setGeometry(100, 150, 320, 100)
        self.setWindowTitle("Testing dialog input")

        self.name = ""
        btn_name = QPushButton("Get Name")
        self.connect(btn_name, SIGNAL("clicked()"), self.get_name)

        btn_age = QPushButton("Get Age")
        # bind the button click to a function reference
        self.connect(btn_age, SIGNAL("clicked()"), self.get_age)

        self.label = QLabel("------------------")

        # use grid layout for the widgets
        grid = QGridLayout()
        # addWidget(widget, row, column, rowSpan=1, columnSpan=1)
        grid.addWidget(btn_name, 0, 0)
        grid.addWidget(btn_age, 1, 0)
        # this will span the label over 3 columns
        grid.addWidget(self.label, 2, 0, 1, 3)
        self.setLayout(grid)

    def get_name(self):
        self.name, ok = QInputDialog.getText(self,
                self.tr("Name"),
                self.tr("Enter your name:"))
        self.show_result(ok)

    def get_age(self):
        # initial age 0, limit between 1 and 120
        self.age, ok = QInputDialog.getInteger(self,
                self.tr("Age"),
                self.tr("Enter your age:"),
                0, 1, 120)
        self.show_result(ok)

    def show_result(self, ok):
        if ok and self.name and str(self.age):
            s = "%s you are %s old" % (self.name, self.age)
        elif ok and self.name and not str(self.age):
            s = self.name
        else:
            s = str(self.age)
        self.label.setText(s)


app =  QApplication(sys.argv)
form = MyForm()
form.show()
app.exec_()

Similar to the PyQT GUI example above, the Thinter GUI toolkit also has input dialogs that validate the input:

# Python GUI toolkit Tkinter has 3 different data input dialogs:
# tkSimpleDialog.askstring(title, prompt [,options])
# tkSimpleDialog.askinteger(title, prompt [,options])
# tkSimpleDialog.askfloat(title, prompt [,options])
# does error trapping with int and float, also optional max/min
# there is also an initialvalue=parameter

try:
    # for Python2
    import Tkinter as tk
    import tkSimpleDialog as tksd
except ImportError:
    # for Python3
    import tkinter as tk
    import tkinter.simpledialog as tksd


root = tk.Tk()

# parent=root needed to put dialog window on top of parent root window
mystr = tksd.askstring("Dialog (String)", "Enter your name:", parent=root)
print(mystr)

age = tksd.askinteger("Dialog (Integer)", "Enter your age:", parent=root,
    minvalue=0, maxvalue=120)
print(age)

pay = tksd.askfloat("Dialog (Float)", "Enter your annual pay:",
    parent=root, minvalue=1000)
print(pay)

root.mainloop()

# optional help
help(tksd)

The PyQT GUI toolkit's QLabel widget can actually display HTML formatted text directly. This allows for relatively easy formatting of text:

# PyQT's QLabel widget can display html formatted text

import sys
# use this import option for simplicity
from PyQt4.QtCore import *
from PyQt4.QtGui import *

class MyForm(QWidget):
    def __init__(self, html_text):
        QWidget.__init__(self)
        # setGeometry(x_pos, y_pos, width, height)
        self.setGeometry(100, 150, 320, 100)
        self.setWindowTitle("html formatted text")

        self.label = QLabel(html_text)

        # use grid layout
        grid = QGridLayout()
        # addWidget(widget, row, column, rowSpan=1, columnSpan=1)
        grid.addWidget(self.label, 0, 0)
        self.setLayout(grid)

# color is in hex format "#RRGGBB"
html_text = """\
<font face="Times New Roman" size=7 color="#0000FF">
Example of <b>bold</b> html formatted text in blue
</font>
"""
app =  QApplication(sys.argv)
form = MyForm(html_text)
form.show()
app.exec_()

Since Pygame does not have a file dialog, we can use Tkinter's file dialog and withdrawing the root so it doesn't clash with Pygame's eventloop:

# experiments with module pygame
# free from: http://www.pygame.org/
# load and display an image using pygame and Tkinter's file dialog

import pygame as pg

# initialize pygame
pg.init()

#---------- uses Tkinter to open an image filename ------------------
import Tkinter as tk
import tkFileDialog as tkfd
root = tk.Tk()
root.withdraw()
dirname = tkfd.askdirectory()
mask = [("GIF and JPEG files","*.gif *.jpg")]
image_file = tkfd.askopenfilename(initialdir=dirname, filetypes=mask)
#--------------------------------------------------------------------

# RGB color tuple used by pygame
white = (255, 255, 255)

# create a 300x300 white screen
screen = pg.display.set_mode((300,300))
screen.fill(white)

# load the image from a file
image = pg.image.load(image_file)

# draw image, position the image ulc at x=50, y=20
screen.blit(image, (50, 20))

# nothing gets displayed until one updates the screen
pg.display.flip()

# start event loop and wait until
# the user clicks on the window corner x
while True:
    for event in pg.event.get():
        if event.type == pg.QUIT:
            raise SystemExit

Looking at PyQT's grid layout manager:

# pqt_gridlayout1.py
# start of small calculator

import sys
# simple general import
from PyQt4.QtCore import *
from PyQt4.QtGui import *

class GridLayout(QWidget):
    def __init__(self, parent=None):
        QWidget.__init__(self, parent)
        self.setWindowTitle('grid layout')

        bt_names = ['Cls', 'Bck', '', 'Close',
            '7', '8', '9', '/',
            '4', '5', '6', '*',
            '1', '2', '3', '-',
            '0', '.', '=', '+']

        grid = QGridLayout()

        pos = [(0, 0), (0, 1), (0, 2), (0, 3),
            (1, 0), (1, 1), (1, 2), (1, 3),
            (2, 0), (2, 1), (2, 2), (2, 3),
            (3, 0), (3, 1), (3, 2), (3, 3 ),
            (4, 0), (4, 1), (4, 2), (4, 3)]

        j = 0
        for b in bt_names:
            button = QPushButton(b)
            if j == 2:
                # addWidget(QWidget, row, column, rowSpan, columnSpan)
                grid.addWidget(QLabel(''), 0, 2)
            else: grid.addWidget(button, pos[j][0], pos[j][1])
            j = j + 1

        self.setLayout(grid)


app = QApplication(sys.argv)
qb = GridLayout()
qb.show()
sys.exit(app.exec_())
Be a part of the DaniWeb community

We're a friendly, industry-focused community of developers, IT pros, digital marketers, and technology enthusiasts meeting, networking, learning, and sharing knowledge.