Facial emotion detection, as the name suggests, involves detecting emotions from faces in images or videos.
Recently, I was working on a facial emotion detection task and came across the DeepFace library that implements various state-of-the-art facial emotion detection models. However, in my experience, the performance of the DeepFace library is not up to the mark, particularly on low-resolution datasets.
As an alternative, I fine-tuned the vision transformer for facial emotion detection in PyTorch. The results showed that the vision transformer model performed much better than DeepFace.
In this article, I will explain the process of facial emotion detection using both DeepFace and vision transformers and compare their results for facial emotion detection.
So, let's begin without an ado.
Download and Importing the Dataset
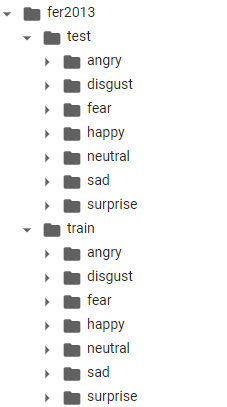
We will use the FER2013 dataset, which contains 35,887 images of faces with seven emotions: angry, disgust, fear, happy, sad, surprise, and neutral. The images are grayscale and have a resolution of 48x48 pixels. The dataset is divided into two subsets: train and test.
You can download the dataset from this link and unzip it in your working directory. The directory structure for the dataset looks like this. Each sub-folder in the test and train directories contains images with corresponding emotions.
For example, the "angry" folder contains facial images depicting angry emotion.
Next, we will create a Pandas DataFrame from the images and their labels. Before that, let's install and import the required libraries.
! pip install deepface

import os
import pandas as pd
from sklearn.model_selection import train_test_split

from deepface import DeepFace
import cv2
from matplotlib import pyplot as plt
from deepface import DeepFace
from tqdm import tqdm
from sklearn.preprocessing import LabelEncoder
from sklearn.metrics import f1_score, classification_report, accuracy_score
We will create a Pandas DataFrame containing image paths and the corresponding emotion labels. To do so, we will define a get_emotions_df() function, as shown in the following script.
This function takes the root folder of the dataset as an argument and returns a DataFrame with two columns: image path and emotion. The image path column contains the full path to each image file, and the emotion column contains the corresponding emotion label. The function also shuffles the DataFrame to ensure a random order of the data.
def get_emotions_df(root_folder):

  paths = []
  emotions = []

  # Iterate through sub-folders
  for emotion_folder in os.listdir(root_folder):
      emotion_path = os.path.join(root_folder, emotion_folder)

      # Check if the path is a directory
      if os.path.isdir(emotion_path):
          # Iterate through images in the sub-folder
          for image_file in os.listdir(emotion_path):
              # Construct the full path to the image
              image_path = os.path.join(emotion_path, image_file)

              # Append the image path and emotion to the lists
              paths.append(image_path)
              emotions.append(emotion_folder)

  # Create a DataFrame from the lists
  emotions_data = pd.DataFrame({'image path': paths, 'emotion': emotions})

  # Shuffle and display the DataFrame
  emotions_data = emotions_data.sample(frac=1).reset_index(drop=True)

  return emotions_data
Next, we will load the test subset of the dataset and split it into two halves: one for testing and one for validation.
I divided the dataset into two halves at this stage since I will first directly make the test predictions using the DeepFace library.
In the next step, I will use the same test and validation split while fine-tuning the Vision transformer model to ensure comparison transparency.
test_path = "/content/fer2013/test"
test_df = get_emotions_df(test_path)
print(test_df.shape)
test_df, val_df = train_test_split(test_df, test_size=0.5, random_state=42)


print(test_df.shape)
print(test_df['emotion'].value_counts())
test_df.head()
Output:
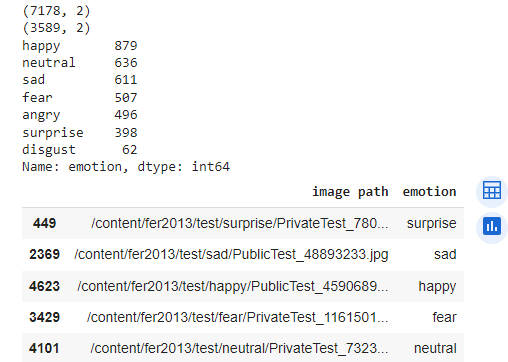
The output shows that the test subset has 7178 images, and we split it into two DataFrames with 3589 images each. We can also see the distribution of the emotions in the test DataFrame.
We can also plot some images using the plot_image() method defined in the following script.
def plot_image(image_path):
  image = cv2.imread(image_path)

  # OpenCV reads images in BGR format, but Matplotlib expects RGB, so we need to convert the color space
  image_rgb = cv2.cvtColor(image, cv2.COLOR_BGR2RGB)

  # Plot the image using Matplotlib
  plt.imshow(image_rgb)
  plt.axis('off')  # Turn off axis labels
  plt.show()
For example, we can plot the fourth image in the test DataFrame and see its emotion label.
print(test_df['emotion'].iloc[3])
image = test_df['image path'].iloc[3]
plot_image(image)
Output:

The output shows that the image has the emotion label of "fear" and displays a screaming face.
Facial Emotion Detection with DeepFace
DeepFace is a Python library that provides various facial analysis functionalities, such as facial recognition, emotion detection, age and gender estimation, and facial attribute analysis. DeepFace supports several state-of-the-art pre-trained models for emotion detection, such as opencv, retinaface, mtcnn, ssd, dlib, mediapipe, etc.
In one of my previous articles on extracting faces from videos in Python, I explained how to work with DeepFace library in Python. The core principles remain the same for emotion detection. However, we will use the DeepFace.analyze() function for facial emotion.
The analyze() function takes an image path and a list of actions as inputs and returns a dictionary of results. We will use the emotion action to get the emotion predictions for each image. We will also set the enforce_detection parameter to False to avoid errors when the face is undetected.
By default, the analyze() function uses the opencv backend for detecting emotion. You can set other detectors using the detector_backend parameter.
The following script detects emotion from the image we plotted earlier.
emotions = DeepFace.analyze(img_path = image,
        actions = ['emotion'],
        enforce_detection = False
)
emotions
The output is a dictionary that contains the emotion probabilities and the dominant emotion for each image. For the input image, the most dominant emotion is fear, with a probability value of 65.9%.
Output:
Action: emotion: 100%|██████████| 1/1 [00:00<00:00,  1.86it/s]
[{'emotion': {'angry': 33.85527028378603,
   'disgust': 0.1053470177721062,
   'fear': 65.98977851989525,
   'happy': 0.039146710759234635,
   'sad': 0.0034502041196672923,
   'surprise': 0.004411022220518585,
   'neutral': 0.0025878910135360904},
  'dominant_emotion': 'fear',
  'region': {'x': 0, 'y': 0, 'w': 48, 'h': 48}}]
You can extract the value of the dominant emotion using the following script.
# Extract the 'emotion' dictionary from the data
emotion_dict = emotions[0]['emotion']

# Find the emotion with the highest value
dominant_emotion = max(emotion_dict, key=emotion_dict.get)

print("Dominant Emotion:", dominant_emotion)
Output:
Dominant Emotion: fear
Next, we will define the get_df_emotions() function to get the dominant emotion for each image in the test set. The get_df_emotions() function takes an image path and a detector backend as inputs, and returns the dominant emotion as output. We will also use a global variable i to keep track of the number of images processed and print a message every 100 images:
i = 0

def get_df_emotions(image, detector = 'opencv'):

  global i
  emotions = DeepFace.analyze(img_path = image,
                              actions = ['emotion'],
                              enforce_detection = False,
                              detector_backend = detector
                              )
  emotion = get_dominant_emotion(emotions)
  i = i + 1

  if i % 100 == 0:
    print("=================================")
    print(f"Number of images processed: {i}")
    print("=================================")

  return emotion

def get_dominant_emotion(emotions):
  emotion_dict = emotions[0]['emotion']

  # Find the emotion with the highest value
  dominant_emotion = max(emotion_dict, key=emotion_dict.get)

  return dominant_emotion
Then, we will apply the function to the image path column of the test DataFrame, and store the results in a Pandas series:
pred_emotions_list = test_df['image path'].apply(get_df_emotions)
The above script will take some time to execute, depending on the test set's size and your machine's speed. Once the above script is executed, we will have a list of predicted emotions for each image in the test set.
The final step is to evaluate the performance of the emotion detection model. We will use the sklearn library to encode the actual labels and the predicted labels into numerical values and then compute the classification report and the accuracy score:
label_encoder = LabelEncoder()
y_true = label_encoder.fit_transform(test_df['emotion'])
y_pred = label_encoder.transform(pred_emotions_list)

print(classification_report(y_true, y_pred))
print(accuracy_score(y_true, y_pred))
Output:
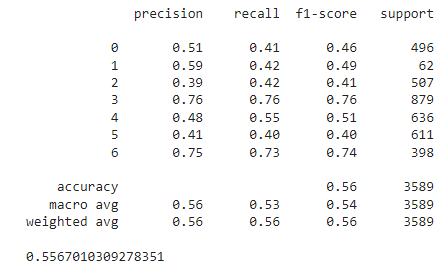
We can see that the model achieved an accuracy of 55.6% on the test, which is not optimal. The human level accuracy for the FER2013 dataset is around 65% as per this paper, and the highest performance achieved is 75.2%.
In the next section, I will explain the results achieved via the vision transformer.
Facial Emotion Detection Using Vision Transformers
Vision transformer is one of the state-of-the art models for image representation in latent space.
To compare the performance of the vision transformer with DeepFace algorithms, I tried fine-tuning the vision transformer model on the training set of the FER2013 dataset. I evaluated the trained model on the same test used for the DeepFace.
We will fine-tune the Hugging Face version of the vision transformer.
I have already explained how to perform image classification with vision transformers in Hugging Face. We will use the same concept in this article. However, we will make slight modifications in the code since instead of doing binary classification, we will do multi-class classification of images.
You can install the hugging-face library using the following script.
! pip install accelerate -U
! pip install datasets transformers[sentencepiece]
The following script imports the required libraries for this tutorial.
from transformers import ViTModel, ViTFeatureExtractor, ViTModel, AdamW
import torch
import torch.nn as nn
from torch.utils.data import Dataset, DataLoader
from datasets import load_dataset
import os
from PIL import Image
import random
import numpy as np
The script below imports the training set of the FER2013 library.
train_path = "/content/fer2013/train"
train_df = get_emotions_df(train_path)
print(train_df.shape)
Output:
(28709, 2)
Next, we will convert the emotion labels in our dataset to numeric values.
label_encoder = LabelEncoder()
train_df['emotion'] = label_encoder.fit_transform(train_df['emotion'])
test_df['emotion'] = label_encoder.transform(test_df['emotion'])
val_df['emotion'] = label_encoder.transform(val_df['emotion'])
The subsequent step is to import the vision transformer model and image processor.
model_checkpoint = "google/vit-base-patch16-224-in21k"
image_processor = ViTFeatureExtractor.from_pretrained(model_checkpoint)
device = torch.device('cuda' if torch.cuda.is_available() else 'cpu')
Next, we define the ImageClassificationDataset class, a PyTorch dataset class that transforms our train, test, and validation dataframes into PyTorch datasets.
class ImageClassificationDataset(Dataset):
    def __init__(self, data_df, image_processor):
        self.data_df = data_df
        self.image_processor = image_processor
        #self.max_length = 256 # set a fixed maximum length

    def __len__(self):
        return len(self.data_df)

    def __getitem__(self, index):

        image_path = self.data_df.iloc[index]['image path']
        image_val = Image.open(image_path)

        if image_val.mode != 'RGB':
          image_val = image_val.convert('RGB')

        image_encodings = image_processor(image_val, return_tensors="pt")

        labels = self.data_df.iloc[index][['emotion']].values.astype(int)

        return image_encodings, labels
Finally, using the following script, we can convert train_df, test_df, and val_df DataFrames to PyTorch datasets.
Additionally, we create DataLoader objects with a batch size of 32 for iterating through the datasets in batches.
train_dataset = ImageClassificationDataset(train_df, ViTFeatureExtractor)
test_dataset = ImageClassificationDataset(test_df, ViTFeatureExtractor)
val_dataset = ImageClassificationDataset(val_df, ViTFeatureExtractor)

batch_size = 32

train_loader = DataLoader(train_dataset, batch_size=batch_size, shuffle=True)
val_loader = DataLoader(val_dataset, batch_size=batch_size, shuffle=False)
test_loader = DataLoader(test_dataset, batch_size=batch_size, shuffle=False)
The next step is to define a PyTorch model that fine-tunes the vision transformer model for emotion classification.
Our Pytorch model will have two components: an encoder and a classifier. The encoder is a vision transformer responsible for extracting features from the facial images, and the classifier is responsible for predicting the emotion labels from the features. We will use the following code to define the EmotionClassifier PyTorch model.
class EmotionClassifier(nn.Module):
    def __init__(self, num_labels, encoder):
        super(EmotionClassifier, self).__init__()
        self.encoder = encoder
        self.classifier = nn.Sequential(
            nn.Linear(self.encoder.config.hidden_size, 1000),
            nn.ReLU(),
            nn.Linear(1000, 500),
            nn.ReLU(),
            nn.Linear(500, 300),
            nn.ReLU(),
            nn.Linear(300, 100),
            nn.ReLU(),
            nn.Linear(100, 50),
            nn.ReLU(),
            nn.Linear(50, num_labels),
        )

    def forward(self, input_values):
        outputs = self.encoder(pixel_values = input_values)
        pooled_output = outputs['last_hidden_state'][:, 0, :]
        logits = self.classifier(pooled_output)
        return logits
The following script defines the loss function and optimizer. We will use the AdamW optimizer and CrossEntropyLoss function since we have a multi-class classification problem.
# Set up the model, optimizer, scheduler, and loss function
num_labels = train_df["emotion"].nunique()
encoder = ViTModel.from_pretrained("google/vit-base-patch16-224-in21k")
model = EmotionClassifier(num_labels, encoder).to(device)
optimizer = AdamW(model.parameters(), lr=0.0001, betas=(0.9, 0.999), eps=1e-08)
criterion = nn.CrossEntropyLoss()
Next, we will define a function for training. We will monitor the best validation accuracy after each epoch and save the model with the best validation accuracy.
# Define the training function
def train(model, train_loader, val_loader, optimizer,  criterion, device, num_epochs):

    best_accuracy = 0.0

    for epoch in range(num_epochs):

        model.train()

        for i, batch in enumerate(train_loader):

            image_encodings,  labels = batch
            pixel_values = image_encodings.pixel_values
            pixel_values = pixel_values.squeeze()
            pixel_values = pixel_values.to(device)

            labels = labels.view(-1)
            labels = labels.to(device)

            optimizer.zero_grad()

            logits = model(pixel_values)

            loss = criterion(logits, labels)
            loss.backward()

            optimizer.step()

            if (i+1) % batch_size == 0:
                print(f'Epoch {epoch+1}/{num_epochs}, Batch {i+1}/{len(train_loader)}, Train Loss: {loss.item() :.4f}')
                train_loss = 0.0

        val_loss, val_accuracy, val_f1, _ , _ = evaluate(model, val_loader, device)

        if val_accuracy > best_accuracy:
            best_accuracy = val_accuracy
            torch.save(model.state_dict(), 'best_model.pt')

        print("========================================================================================")
        print(f'Epoch {epoch+1}/{num_epochs}, Val Loss: {val_loss:.4f}, Val Accuracy: {val_accuracy:.4f}, Val F1: {val_f1:.4f}, Best Accuracy: {best_accuracy:.4f}')
        print("========================================================================================")
The following script defines the evaluate() method, which evaluates the performance of the trained model on the validation set after each epoch. We will also use this method to evaluate our model performance on the test set.
def evaluate(model, data_loader,  device):

    all_labels = []
    all_preds = []
    total_loss = 0.0

    with torch.no_grad():

        for i, batch in enumerate(data_loader):

          image_encodings,  labels = batch
          pixel_values = image_encodings.pixel_values
          pixel_values = pixel_values.squeeze()
          pixel_values = pixel_values.to(device)

          labels = labels.view(-1)
          labels = labels.to(device)

          optimizer.zero_grad()

          logits = model(pixel_values)

          loss = criterion(logits, labels)
          total_loss += loss.item()

          _, preds = torch.max(logits, 1)
          all_labels.append(labels.cpu().numpy())
          all_preds.append(preds.cpu().numpy())

    all_labels = np.concatenate(all_labels, axis=0)
    all_preds = np.concatenate(all_preds, axis=0)

    loss = total_loss / len(data_loader)
    accuracy = accuracy_score(all_labels, all_preds)
    f1 = f1_score(all_labels, all_preds, average = 'macro')
    return loss, accuracy, f1, all_labels, all_preds
Next, we will train our model for five epochs.
num_epochs = 5
train(model, train_loader, val_loader, optimizer, criterion, device, num_epochs)
Output:
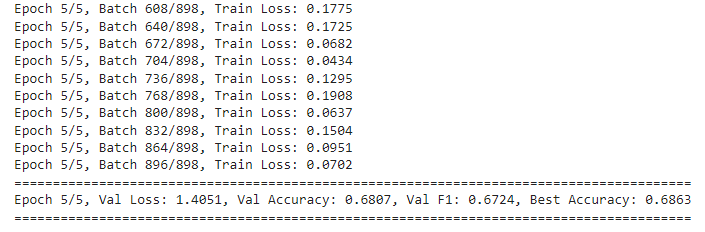
The output shows that we achieved a validation accuracy of 68.63% on the validation set.
Finally, we can load the model with the best validation accuracy and use it to make predictions on the test set.
state_dict = torch.load('best_model.pt')

model = EmotionClassifier(num_labels, encoder).to(device)
model.load_state_dict(state_dict)

_, _, _, all_labels, all_preds = evaluate(model, test_loader, device)

print(classification_report(all_labels, all_preds))
print(accuracy_score(all_labels, all_preds))
Output:
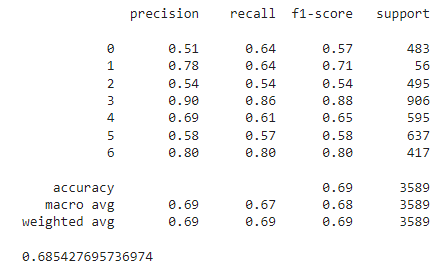
We achieved a test accuracy of 68.54% on the test, which is far better than the 55.67% achieved by the DeepFace model. The test accuracy is also better than the human-level accuracy of 65.5%.
Conclusion
Python DeepFace library is a useful library that performs many facial recognition tasks out of the box. However, I found that for complex facial recognition tasks, DeepFace model performance suffers. I recommend fine-tuning your models via state-of-the-art convolutional neural networks or vision transformers in such scenarios. In addition, you can improve the performance of the vision transformer models implemented in this article using regularization and dropout techniques.
I hope you liked this tutorial. If you have any suggestions or feedback, feel free to comment.
