Introduction
This tutorial explains how to perform multiple-label text classification using the Hugging Face transformers library. Hugging Face library implements advanced transformer architectures, proven to be state-of-the-art for various natural language processing tasks, including text classification.
Hugging Face library provides trainable transformer models in three flavors:
- Via the Trainer Class API
- Via PyTorch Models
- Via TensorFlow Models
The HuggingFace documentation for Trainer Class API is very clear and easy to use. However, I wanted to train my text classification model in TensorFlow. After some research, I found that the Hugginface API lacks documentation on fine-tuning transformers models for multilabel text classification in TensorFlow.
In this tutorial, I will explain how I fine-tuned a Hugging Face transformers model for multilabel text classification in TensorFlow.
Dataset
I will use the Toxic Comment Dataset From Kaggle to fine-tune my transformer model. Download the dataset's CSV file and import it into your Python script using the Pandas dataframe, as shown in the following script:
import pandas as pd

dataset = pd.read_csv('/content/fake-and-real-news-dataset/train.csv')
print(dataset.shape)
dataset.head()
Output:
The above output shows that the dataset contains more than 159k records. The dataset consists of 8 columns. The text comment_text column contains user comments. A comment can be categorized into one or more categories: toxic, severe toxic, obscene, threat, insult, or identity hate. A one is added in a column if a comment belongs to the column category, else a zero is added.
Several comments in the dataset do not fall into any of the comment categories. The following script returns these records:
no_toxic_comments_df = dataset[(dataset[['toxic',
                                         'severe_toxic',
                                         'obscene',
                                         'threat',
                                         'insult',
                                         'identity_hate']] == 0).all(axis=1)]

print(no_toxic_comments_df.shape)
Output:
(143346, 8)The above output shows that more than 143k records do not fall into any comment category. I will remove these records since I am only interested in comments assigned to at least one category.
toxic_comments_df = dataset[(dataset[['toxic',
                                         'severe_toxic',
                                         'obscene',
                                         'threat',
                                         'insult',
                                         'identity_hate']] != 0).any(axis=1)]

print(toxic_comments_df.shape)
Output:
(16225, 8)Data Preprocessing
Like every machine learning problem, we need to divide our dataset into features and labels set before model training. Subsequently, we need to divide our dataset into training and test sets. The following script does that.
X = list(toxic_comments_df['comment_text'])
y = toxic_comments_df.drop(['id', 'comment_text'], axis = 1).values.tolist()


from sklearn.model_selection import train_test_split

X_train, X_test, y_train, y_test = train_test_split(X, y, test_size=0.20, random_state=42)
Hugging Face transformers model accept data input data to be in a particular format. You can use tokenizers to convert raw text into the Hugging Face complaint format.
The script below installs the Hugging Face library.
! pip install datasets transformers[sentencepiece]The following script defines the transformer model (English Distil Bert), and the tokenizer for the model.
model_name = "distilbert-base-uncased-finetuned-sst-2-english"

from transformers import AutoTokenizer, TFAutoModel
tokenizer = AutoTokenizer.from_pretrained(model_name, do_lowercase = True)
bert = TFAutoModel.from_pretrained(model_name, from_pt = True)
The Tokenizer class object converts the input training and test sets into Distil Bert complaint input format in the following script.
train_encodings = tokenizer(X_train, truncation=True, padding="max_length", max_length=512)
test_encodings = tokenizer(X_test, truncation=True, padding="max_length", max_length=512)
And the script below creates TensorFlow datasets (including output labels) for TensorFlow model training and testing.
train_dataset = tf.data.Dataset.from_tensor_slices((
    dict(train_encodings),
    y_train
))
test_dataset = tf.data.Dataset.from_tensor_slices((
    dict(test_encodings),
    y_test
))
Model Training
The Hugging Face model can be added as an encoder layer to the TensorFlow model. The input is passed to the encoder layer.
Following are the steps to incorporate a Hugging Face transformer model for fine-tuning as a TensorFlow model:
- Create a Python Class that inherits from the
Keras.Modelclass. - Pass the Hugging Face transformer model to the constructor of the Python class you created in the first step. The
encodervariable stores the Huggin Face model in the following script. - In the
Call()method of the class, pass the input (TF datasets) to the encoder layer. - Subsequently, add the standard TensorFlow layer to define the overall model architecture.
The following script defines the TensorFlow model that fine-tunes the Hugging Face transformer. I added three dense layers after the encoder layer. The final dense layer contains six nodes since we have six comment categories in the output.
import tensorflow as tf
from tensorflow import keras
from tensorflow.keras import layers

import numpy as np

class TextClassificationModel(keras.Model):
  def __init__(self, encoder):
    super(TextClassificationModel, self).__init__()
    self.encoder = encoder
    self.encoder.trainable = True
    self.dropout1 = layers.Dropout(0.1)
    self.dropout2 = layers.Dropout(0.1)
    self.dropout3 = layers.Dropout(0.1)
    self.dense1 = layers.Dense(100, activation="relu")
    self.dense2 = layers.Dense(50, activation="relu")
    self.dense3 = layers.Dense(6, activation="sigmoid")

  def call(self, input):
    x = self.encoder(input)
    x = x['last_hidden_state'][:, 0, :]
    x = self.dropout1(x)
    x = self.dense1(x)
    #x = self.dropout2(x)
    x = self.dense2(x)
    #x = self.dropout3(x)
    x = self.dense3(x)
    return x
The script below initializes and compiles our TensorFlow model.
text_classification_model = TextClassificationModel(bert)

metric = "binary_crossentropy"

text_classification_model.compile(
    optimizer = tf.keras.optimizers.Adam(learning_rate=5e-5),
    loss = tf.keras.losses.BinaryCrossentropy(from_logits=True),
    metrics=tf.keras.metrics.BinaryCrossentropy(
    name="binary_crossentropy", dtype=None, from_logits=False, label_smoothing=0))
Finally, you can train the model using the TensorFlow model class's fit() method.
history = text_classification_model.fit(
    train_dataset.shuffle(1000).batch(16),
    epochs=3,
    validation_data=test_dataset.batch(16)
)
Let's plot the model loss against the number of epochs.
import seaborn as sns
import matplotlib.pyplot as plt

sns.set(rc={'figure.figsize':(10,8)})


sns.set_context('poster', font_scale = 1)

plt.plot(history.history['loss'])
plt.plot(history.history['val_loss'])
plt.title('model loss - ' + metric)
plt.ylabel('loss - ' + metric)
plt.xlabel('epoch')
plt.legend(['train', 'test'], loc='upper left')
plt.show()
Output:
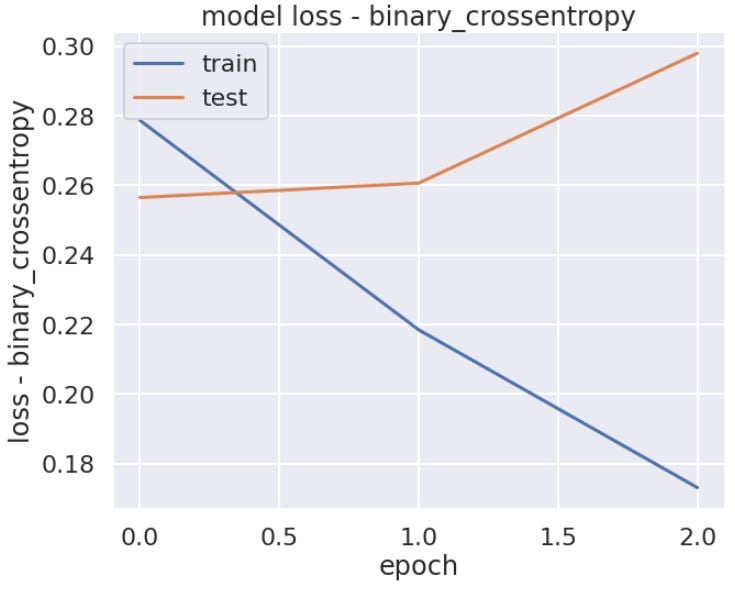
The above plot shows that we achieved the lowest loss after the first epoch, and the model started to overfit after that.
Predictions and Evaluations
The following script makes predictions on the test set.
y_pred = text_classification_model.predict(test_dataset.batch(16))
y_pred[0]
Output:
array([9.9412137e-01, 2.0126806e-04, 1.7747579e-03, 7.2536163e-04,
       3.4322389e-03, 9.6116390e-04], dtype=float32)
The dataset input labels are binary, while the output predictions are continuous numeric values. We will convert continuous output values to binary to compare the test labels with output predictions. All the output values greater than 0.5 are converted to 1, while the values less than or equal to 0.5 are converted to 0.
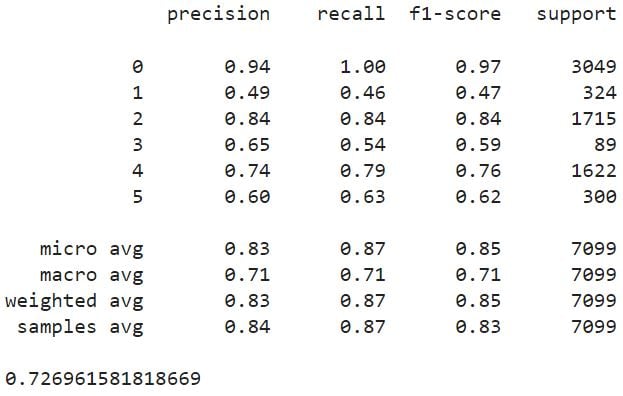
The following script evaluates the model performance.
from sklearn.metrics import roc_auc_score, classification_report

y_pred = (y_pred >0.50)


print(classification_report(y_test, y_pred))

roc_auc = roc_auc_score(y_test, y_pred, average = 'macro')
print(roc_auc)
Output:


