I recently tackled a challenging research task involving multimodal data for a classification problem using TensorFlow Keras. One of the trickiest aspects was figuring out how to load multimodal data in batches from storage efficiently.
While TensorFlow Keras offers helpful functions for batch-loading images from various sources, the documentation and online resources don't explicitly cover how to load images in combination with other data types like CSV files.
However, with some experimentation, I discovered a solution to this problem. In this article, I'll demonstrate how to create custom data loaders capable of batch-loading data from multiple sources, such as image directories and CSV files.
We will solve a multimodal classification problem with images and corresponding texts as inputs. We will train a Keras model that classifies this multimodal input into one of the three predefined categories. This is called multi-class classification.
So, let's begin without ado.
Importing Required Libraries
We will extract text and image features using Transformer models from the Huggingface library. The following script installs the Huggingface transformers library.
! pip install accelerate -U
! pip install datasets transformers[sentencepiece]
The script below imports the libraries required to execute scripts in this article. I did not have to install these libraries since I used a Google Colab notebook.
import pandas as pd
import os
import numpy as np

import tensorflow as tf

from transformers import AutoTokenizer, TFBertModel
from transformers import AutoImageProcessor, TFViTModel


from keras.utils import Sequence
from keras.preprocessing.sequence import pad_sequences
from keras.layers import Input, Dense, Dropout, Concatenate
from keras.callbacks import ModelCheckpoint
from keras.models import load_model, Model
from keras.optimizers import Adam
from sklearn.model_selection import train_test_split
from sklearn.metrics import classification_report, accuracy_score

from PIL import Image, ImageFile
ImageFile.LOAD_TRUNCATED_IMAGES = True
Importing and Preprocessing the Dataset
We will train our multimodal classifier using the Meme Images Dataset from Kaggle. The dataset consists of meme images and meme text. The dataset is annotated with labels very_positive, positive, neutral, negative, and very_negative.
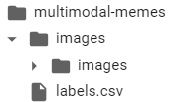
You will see the following directory structure once you download the dataset.

The labels.csv file contains meme image names, texts, and corresponding labels. The following script imports the labels.csv file as a Pandas dataframe and displays its header.
labels_df = pd.read_csv("/content/multimodal-memes/labels.csv")
labels_df.head()
Output:

The next step is to preprocess our dataset.
First, we will concatenate the directory path containing images with the image names in the image_name column. The concatenated image path is stored in a new column named image_path.
Next, we will remove all the records where the text_corrected columns contain a null value or an empty string.
Finally, we will remove all the dataframe columns except text_corrected, image_path, and overall_sentiment.
The text_corrected column contains meme text. The image_path column contains the absolute path to the corresponding meme image. And the overall_sentiment column contains output labels.
The following script performs the above preprocessing steps.
image_folder_path = '/content/multimodal-memes/images/images'
labels_df['image_path'] = labels_df['image_name'].apply(lambda x: os.path.join(image_folder_path, x))
labels_df = labels_df[labels_df['text_corrected'].notna() & (labels_df['text_corrected'] != '')]
labels_df = labels_df.filter(["text_corrected", "image_path", "overall_sentiment"])
We have five output labels. For the sake of simplicity, we will merge the very_positive and very_negative, labels with positive and negative labels, respectively. This reduces the number of output labels to 3.
labels_df['overall_sentiment'] = labels_df['overall_sentiment'].replace({'very_positive': 'positive', 'very_negative': 'negative'})
labels_df = labels_df.sample(frac=1).reset_index(drop=True)
Next, we will divide our dataset into features and label sets and convert output labels to one-hot encoded vectors.
X = labels_df.drop('overall_sentiment', axis=1)
y = labels_df["overall_sentiment"]

# convert labels to one-hot encoded vectors
y = pd.get_dummies(y)
Finally, we will divide our dataset into train, test, and validation sets with ratios of 80, 10, and 10, respectively.
X_train, X_temp, y_train, y_temp = train_test_split(X, y, test_size=0.2, random_state=42)
X_test, X_val, y_test, y_val = train_test_split(X_temp, y_temp, test_size=0.5, random_state=42)
Defining Transformer Models for Text and Image Data
Deep learning algorithms work with numeric data. Therefore, we must convert our text and images into corresponding numeric representations. One way to achieve this is to use Transformer models, which have demonstrated state-of-the-art performance for many natural language and image processing tasks.
For text feature extraction in this article, we will use the BERT transformer. We will use the Vision Transformer for image representation. You can download both of these models from the Huggingface library. You will also need to download the corresponding text and image processors.
The following script installs BERT and Vision Transormoer models.
Also, we will only train the last four layers of both transformer models to speed up the training process.
## importing text model and tokenizer

bert_tokenizer = AutoTokenizer.from_pretrained("bert-base-uncased")
bert_model = TFBertModel.from_pretrained("bert-base-uncased")

for layer in bert_model.layers[:-4]:
    layer.trainable = False

## importing image model and tokenizer

image_processor = AutoImageProcessor.from_pretrained("google/vit-base-patch16-224-in21k")
vit_model = TFViTModel.from_pretrained("google/vit-base-patch16-224-in21k")

for layer in vit_model.layers[:-4]:
    layer.trainable = False
The next section will show you how to create your custom Keras sequence data generator for batch data loading.
Creating Keras Sequence Data Generator for Batch Processing
Creating a custom sequence generator capable of handling multimodal data is the trickiest part of this problem. The Python PyTorch library handles this problem relatively easily using the DataSet class. However, TensorFlow Keras's documentation on handling this problem is not very descriptive.
To define a custom batch data loader in Keras, you must subclass the keras.utils.Sequence class. In the class's __getitem__ method, you need to define your custom data loading logic.
For example, in the following script, we define the MultiModalDataGenerator class that inherits from the Sequence class. We pass the features and labels dataframe, the text tokenizer, the image processor, the batch size for batch loading, and the sequence length for text vectors to the MultiModalDataGenerator class constructor.
We define the batch indices inside the __getitem__method. Next, we loop over all batch indices, and for each index within a batch, we load text from the text_corrected column and images from the image_path column of the features dataframe. We also load labels. We append these values in lists and get feature vectors for texts and images within a batch. The method also returns the corresponding label set. And that's it. You have defined your custom sequence data generator in Keras.
class MultiModalDataGenerator(Sequence):

    def __init__(self, df, labels, tokenizer, image_processor, batch_size=32, max_length=128):
        self.df = df
        self.labels_df = labels
        self.tokenizer = tokenizer
        self.image_processor = image_processor
        self.batch_size = batch_size
        self.max_length = max_length

    def __len__(self):
        # Number of batches per epoch
        return int(np.ceil(len(self.df) / float(self.batch_size)))

    def __getitem__(self, idx):
        # Batch indices
        batch_indices = self.df.index[idx * self.batch_size:(idx + 1) * self.batch_size]

        # Initialize lists to store data
        batch_texts = []
        batch_images = []
        batch_labels = []

        # Loop over each index in the batch
        for i in batch_indices:
            # Append text
            batch_texts.append(self.df.at[i, 'text_corrected'])  # Replace 'text_column' with the name of your text column
            # Append Image paths

            batch_images.append(Image.open(self.df.at[i, 'image_path']).convert("RGB"))

            # Fetch labels
            label_values = self.labels_df.loc[i].values
            batch_labels.append(label_values)

        # Tokenize text data in the batch
        tokenized_data = self.tokenizer(batch_texts, padding='max_length', truncation=True, max_length=self.max_length, return_tensors="tf")

        # Process images

        processed_images = [self.image_processor(images=image, return_tensors="tf") for image in batch_images]
        image_tensors = tf.concat([img['pixel_values'] for img in processed_images], axis=0)


        # Convert labels to numpy array
        batch_labels = np.array(batch_labels, dtype='float32')

        final_features = {'input_ids': tokenized_data['input_ids'],
                          'attention_mask': tokenized_data['attention_mask'],
                          'image_input': image_tensors}
        return final_features, batch_labels
Next, you will create train, test, and validation data generator using the MultiModalDataGenerator class.
max_text_length = 128
batch_size = 8

train_generator = MultiModalDataGenerator(X_train,
                                y_train,
                                bert_tokenizer,
                                image_processor,
                                batch_size,
                                max_text_length)

test_generator = MultiModalDataGenerator(X_test,
                                y_test,
                                bert_tokenizer,
                                image_processor,
                                batch_size,
                                max_text_length)

val_generator = MultiModalDataGenerator(X_val,
                              y_val,
                              bert_tokenizer,
                              image_processor,
                              batch_size,
                              max_text_length)
The rest of the process is similar to training any Keras model, as seen in the next section.
Creating & Training the TensorFlow Keras Multimodal Classifier
We have two inputs to our model: text features and image features. We will pass input_ids and attention_mask obtained from the bert_tokenizer for text features. For images, there will be a single input image_input. It is important to note that the inputs depend on feature extraction techniques, not the data modality or the model structure.
Next, we pass the input_ids, attention_mask, and image_input to the corresponding transformer models and extract model representations. These model representations are concatenated and passed to further fine-tuning layers. Our model only has a single fine-tuning layer of 512 nodes. Finally, we pass the output of the fine-tuning layer to the output layer, which, in our case, consists of 3 nodes corresponding to three output classes.
# Define input layers for text
input_ids = Input(shape=(None,), dtype=tf.int32, name="input_ids")
attention_mask = Input(shape=(None,), dtype=tf.int32, name="attention_mask")

# Define input layer for images
image_input = Input(shape=(3, 224, 224), dtype=tf.float32, name="image_input")

# Get the output of BERT model
bert_outputs = bert_model(input_ids, attention_mask=attention_mask)
pooled_output = bert_outputs.pooler_output

# Get the output of ViT model
vit_outputs = vit_model(image_input)
vit_pooled_output = vit_outputs.pooler_output

# Concatenate the outputs from BERT and ViT
concatenated_outputs = Concatenate()([pooled_output, vit_pooled_output])


# Add additional layers for fine-tuning
x = Dense(512, activation='relu')(concatenated_outputs)
x = Dropout(0.1)(x)
final_output = tf.keras.layers.Dense(3, activation='softmax')(x)

# Create the model
model = Model(inputs=[input_ids, attention_mask, image_input], outputs=final_output)

adam_optimizer = Adam(learning_rate=2e-5)

# Compile the model
model.compile(optimizer = adam_optimizer,
              loss='categorical_crossentropy',
              metrics=['accuracy'])
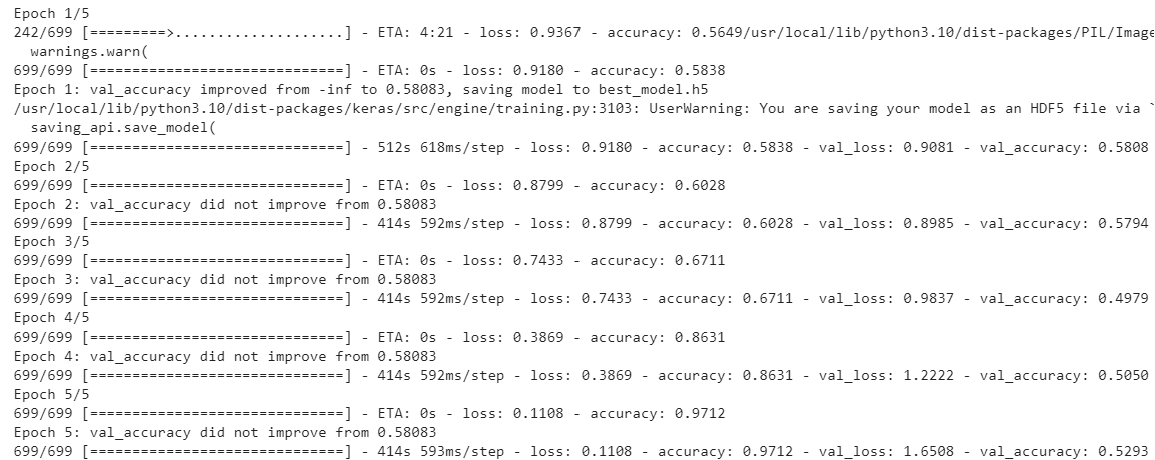
The following script trains the model. We save the model that achieves the highest accuracy on the validation set across all epochs.
# Define the checkpoint callback
checkpoint = ModelCheckpoint(
    'best_model.h5',
    monitor='val_accuracy',
    verbose=1,
    save_best_only=True,
    mode='max',
    save_weights_only=False
)

# Train the model
history = model.fit(
    train_generator,
    validation_data=val_generator,
    epochs=5,
    callbacks=[checkpoint],
    verbose=1
)
Output:

The about output shows that the model is overfitting. You can further add dropout layers and freeze more transformer model layers to see if you get rid of overfitting.
Making Predictions and Evaluating Model Performance
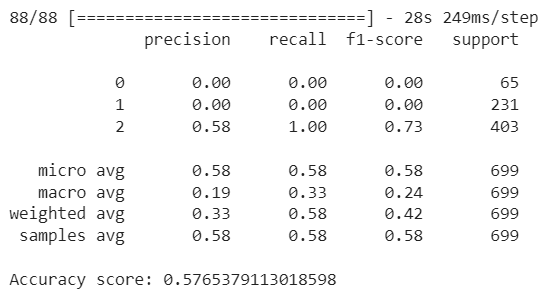
Finally, the script below loads the best model from training and makes predictions on the test set.
# Load the model, including the custom TFBertModel and TFViTModel layers
custom_objects = {"TFBertModel": TFBertModel, "TFViTModel": TFViTModel}
best_model = load_model('best_model.h5', custom_objects=custom_objects)


predictions = best_model.predict(test_generator)

# convert predicitons to binary values
predictions = (predictions == predictions.max(axis=1)[:, None]).astype(int)

# printing results
print(classification_report(y_test, predictions))
print(f"Accuracy score: {accuracy_score(y_test, predictions)}")
Output:

The accuracy is not very high, and the model is clearly biased towards the majority class. You can add more fine-tuning layers to see if you can improve model performance. Nevertheless, the idea here is to demonstrate how to define a custom batch data loader for handling multimodal data. You should now be able to define your custom data generators for batch-loading multimodal data.
Feel free to share your feedback or any questions that you may have.